> ## Documentation Index
> Fetch the complete documentation index at: https://docs.aisync.link/llms.txt
> Use this file to discover all available pages before exploring further.
# Courses
> Complete guide to creating, managing, and organizing courses in the Knowledge Hub with comprehensive course builder, analytics, and content management features
# 📚 Courses Management
The Knowledge Hub Courses feature is a comprehensive learning management system that enables you to create, manage, and organize educational content for your team and organization. This powerful platform provides everything you need to build structured learning experiences with various content types, assessments, progress tracking, and detailed analytics.
## 🚀 Getting Started
**Accessing the Courses Dashboard**
To access the Courses management system:
1. Navigate to **Knowledge Hub** in the main menu
2. Click on **Courses** to view your course library
3. Use the **+ Create Course** button to start building new content
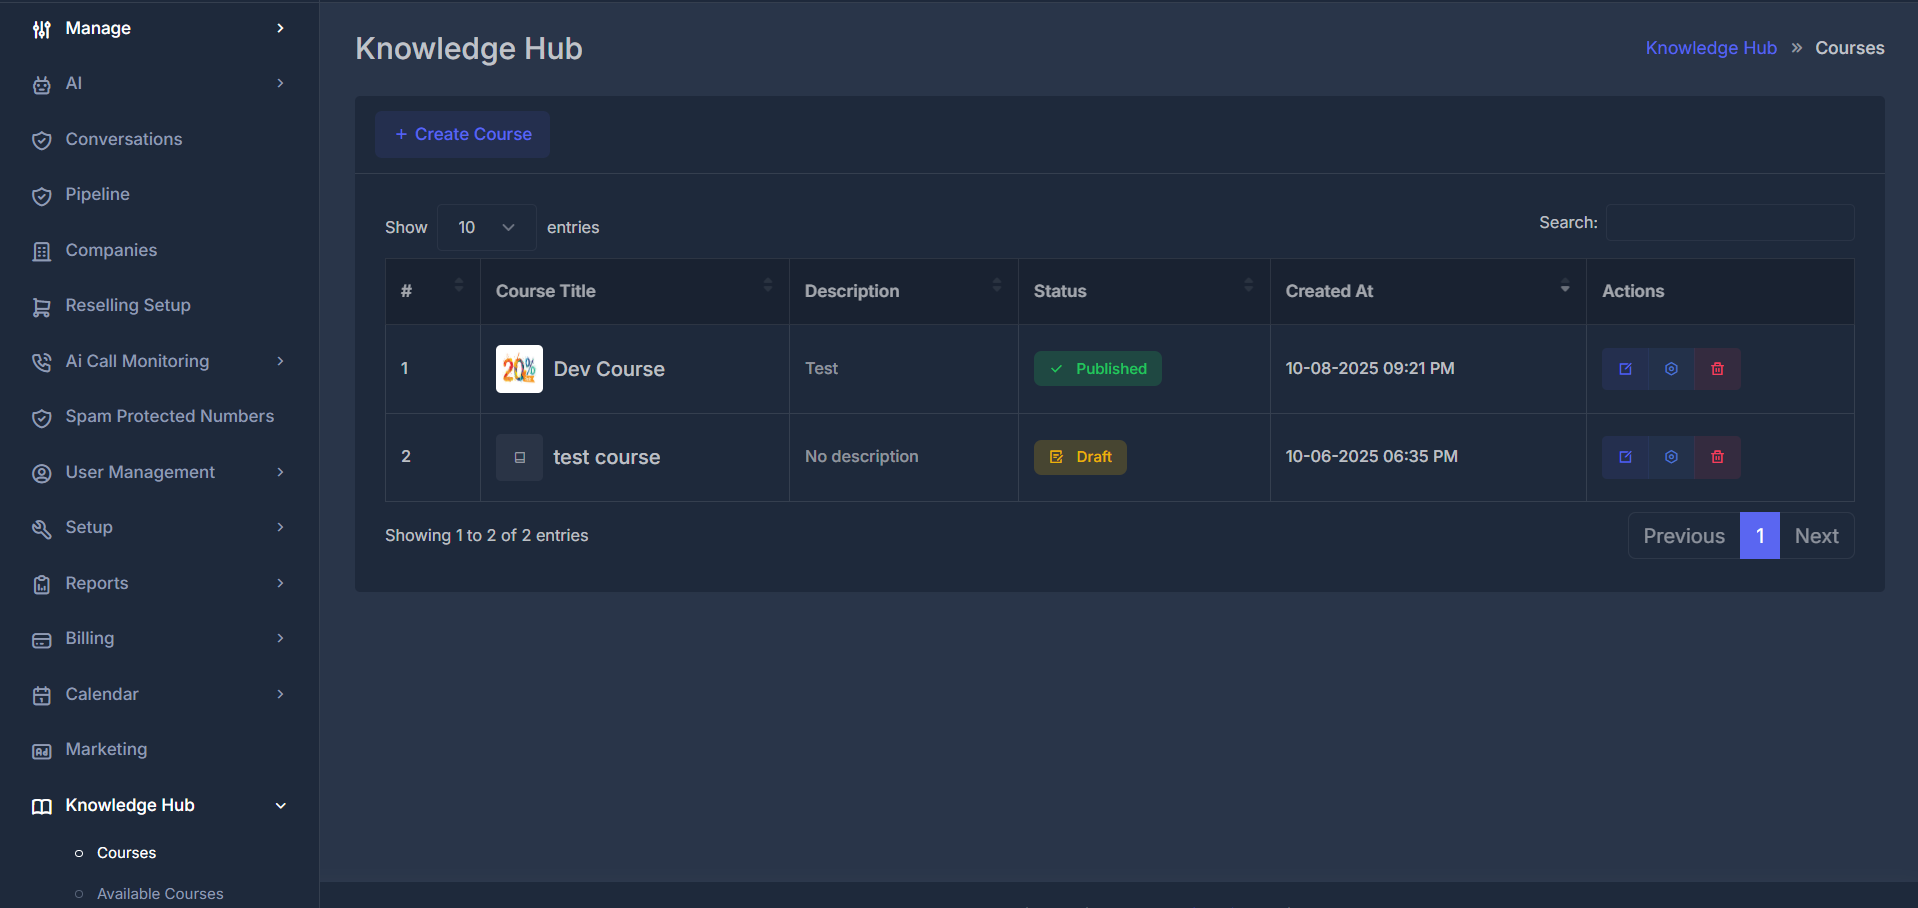
The main courses dashboard provides a comprehensive view of all your courses with advanced filtering, search capabilities, and management tools.
 > **Example:**\
> The Knowledge Hub courses dashboard displays a comprehensive table listing courses such as "Dev Course" (Published, 20% completion) and "test course" (Draft status). The interface includes features like search, entry controls, and action buttons for editing, settings, and deletion.
## 📋 Course Creation Workflow
### Step 1: Basic Course Information
When creating a new course, you'll start with the essential information in a clean, user-friendly form:
> **Example:**\
> The Knowledge Hub courses dashboard displays a comprehensive table listing courses such as "Dev Course" (Published, 20% completion) and "test course" (Draft status). The interface includes features like search, entry controls, and action buttons for editing, settings, and deletion.
## 📋 Course Creation Workflow
### Step 1: Basic Course Information
When creating a new course, you'll start with the essential information in a clean, user-friendly form:
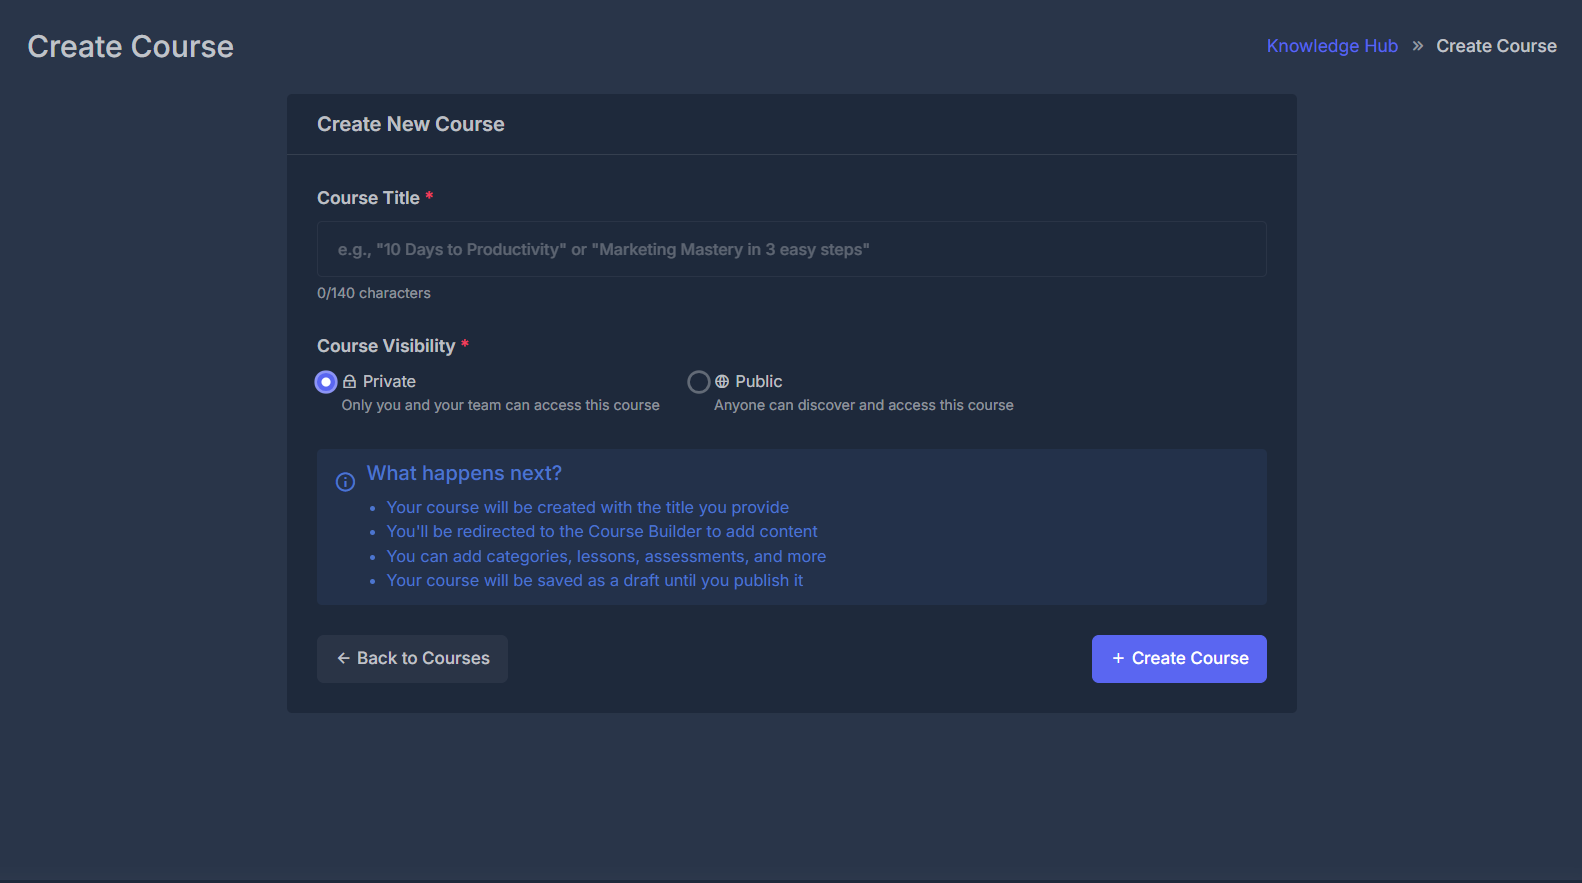 *The "Create New Course" form showing the course title field with character counter (0/140), course visibility options (Private/Public with lock and globe icons), and the informative "What happens next?" section explaining the workflow after course creation.*
### Step 2: Course Builder
After creating the basic course information, you'll be taken to the Course Builder, an intuitive interface designed for structuring your course from start to finish. The builder includes four main tabs:
**Course Builder Tabs:**
* **Outline**: Organize and structure your course content
* **Details**: Edit course information, configure settings
* **Comments**: Manage learner discussions and feedback
* **Analytics**: View performance metrics and enrollment insights
## 🗂️ Course Structure Management
The **Outline** tab enables you to visually build your course using a hierarchical structure. You can create and manage categories, lessons, and assessments within a drag-and-drop interface.
* **Course Structure**: Drag-and-drop to reorder all elements at the top level
* **Categories**: Group lessons and assessments into folders (folder icons)
* **Lessons**: Add individual learning modules (document icons)
* **Assessments**: Insert quizzes and tests (question mark icons)
*The "Create New Course" form showing the course title field with character counter (0/140), course visibility options (Private/Public with lock and globe icons), and the informative "What happens next?" section explaining the workflow after course creation.*
### Step 2: Course Builder
After creating the basic course information, you'll be taken to the Course Builder, an intuitive interface designed for structuring your course from start to finish. The builder includes four main tabs:
**Course Builder Tabs:**
* **Outline**: Organize and structure your course content
* **Details**: Edit course information, configure settings
* **Comments**: Manage learner discussions and feedback
* **Analytics**: View performance metrics and enrollment insights
## 🗂️ Course Structure Management
The **Outline** tab enables you to visually build your course using a hierarchical structure. You can create and manage categories, lessons, and assessments within a drag-and-drop interface.
* **Course Structure**: Drag-and-drop to reorder all elements at the top level
* **Categories**: Group lessons and assessments into folders (folder icons)
* **Lessons**: Add individual learning modules (document icons)
* **Assessments**: Insert quizzes and tests (question mark icons)
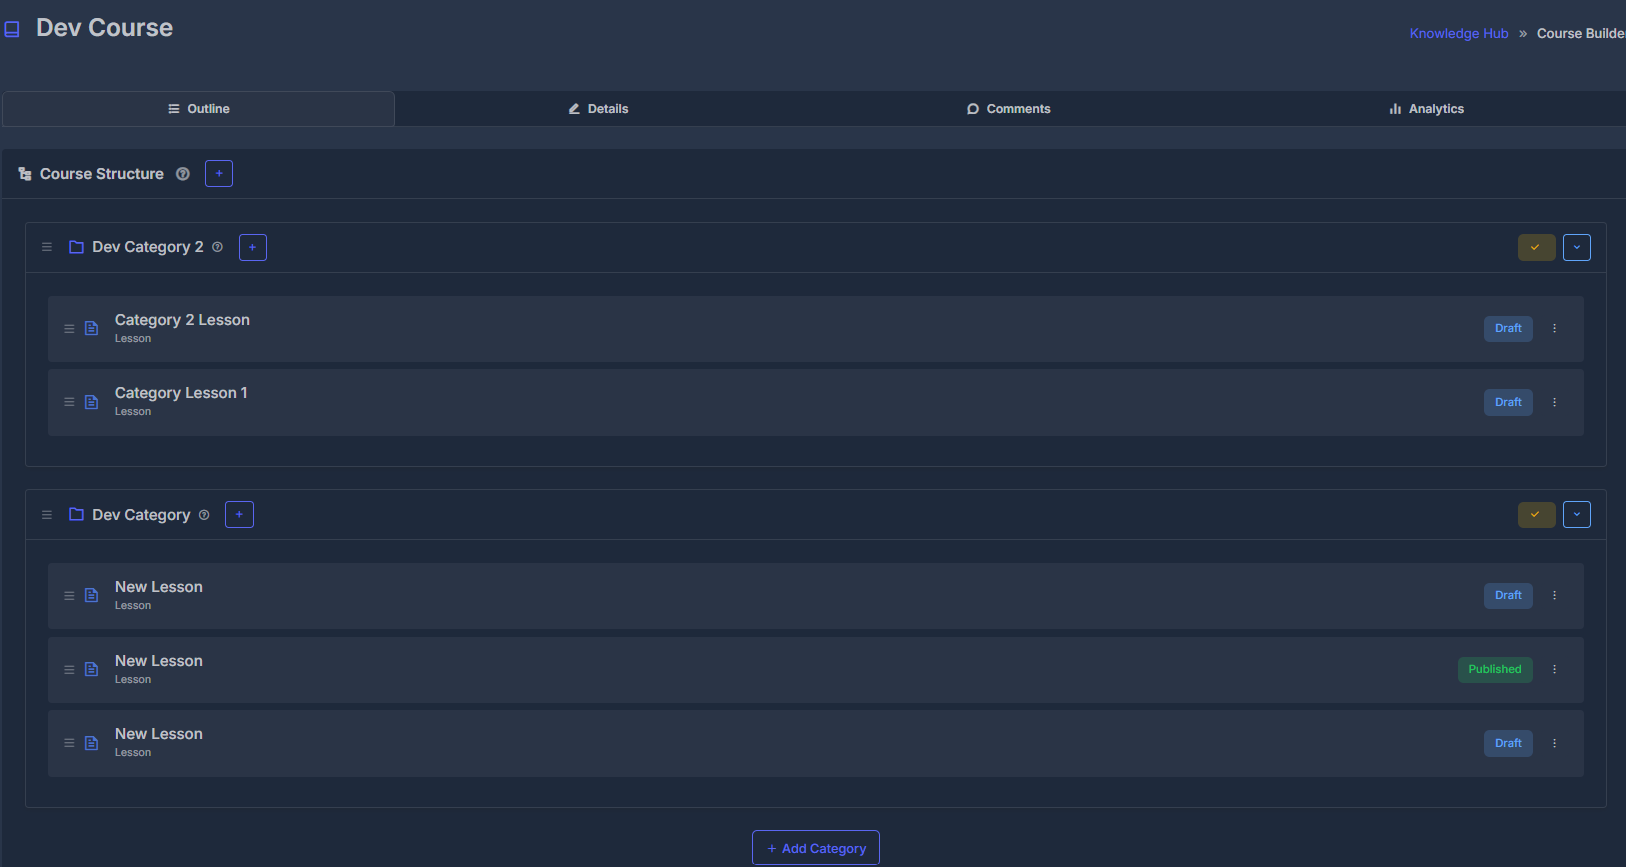 *The screenshot above shows a typical Course Builder "Outline" tab with a category ("Dev Category") and a lesson ("New Lesson") nested within. Elements can be reordered, edited, or added using plus and reorder buttons. You may see status indicators (such as "Published" for a lesson) and convenient controls for structure management.*
* **Lessons**: Add individual learning modules (document icons)
* **Assessments**: Insert quizzes and tests (question mark icons)
*The screenshot above shows a typical Course Builder "Outline" tab with a category ("Dev Category") and a lesson ("New Lesson") nested within. Elements can be reordered, edited, or added using plus and reorder buttons. You may see status indicators (such as "Published" for a lesson) and convenient controls for structure management.*
* **Lessons**: Add individual learning modules (document icons)
* **Assessments**: Insert quizzes and tests (question mark icons)
 What happens next?
• Your course will be created with the title you provide
• You'll be redirected to the Course Builder to add and organize your content
• Add categories to group lessons, create lessons within categories, and include assessments as needed
• You can drag, reorder, and nest items to customize your course structure
• Your course will remain a draft until you publish it
### 🗂️ Add Categories
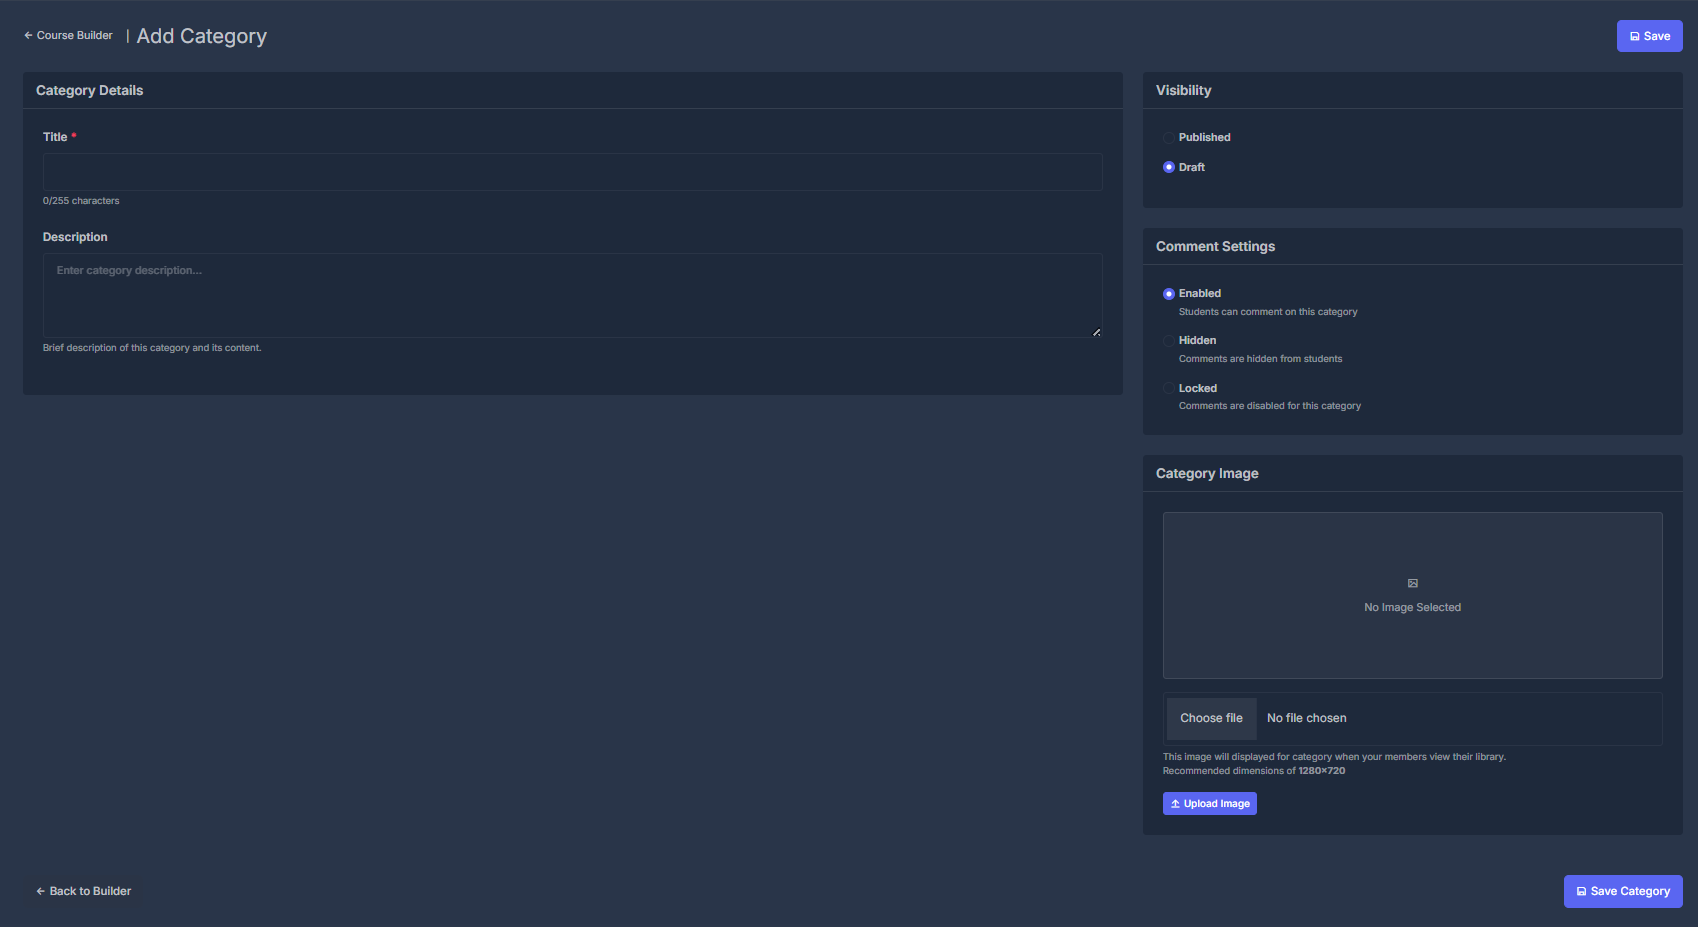
Give your course a clear, engaging structure by creating **Categories**—the building blocks for organizing all your content! Categories make it easy for learners to navigate, and for you to group lessons, assessments, and resources into intuitive sections.
**👷 Quick Steps to Add a Category:**
1. **Click "Add Category"** in the Course Builder.
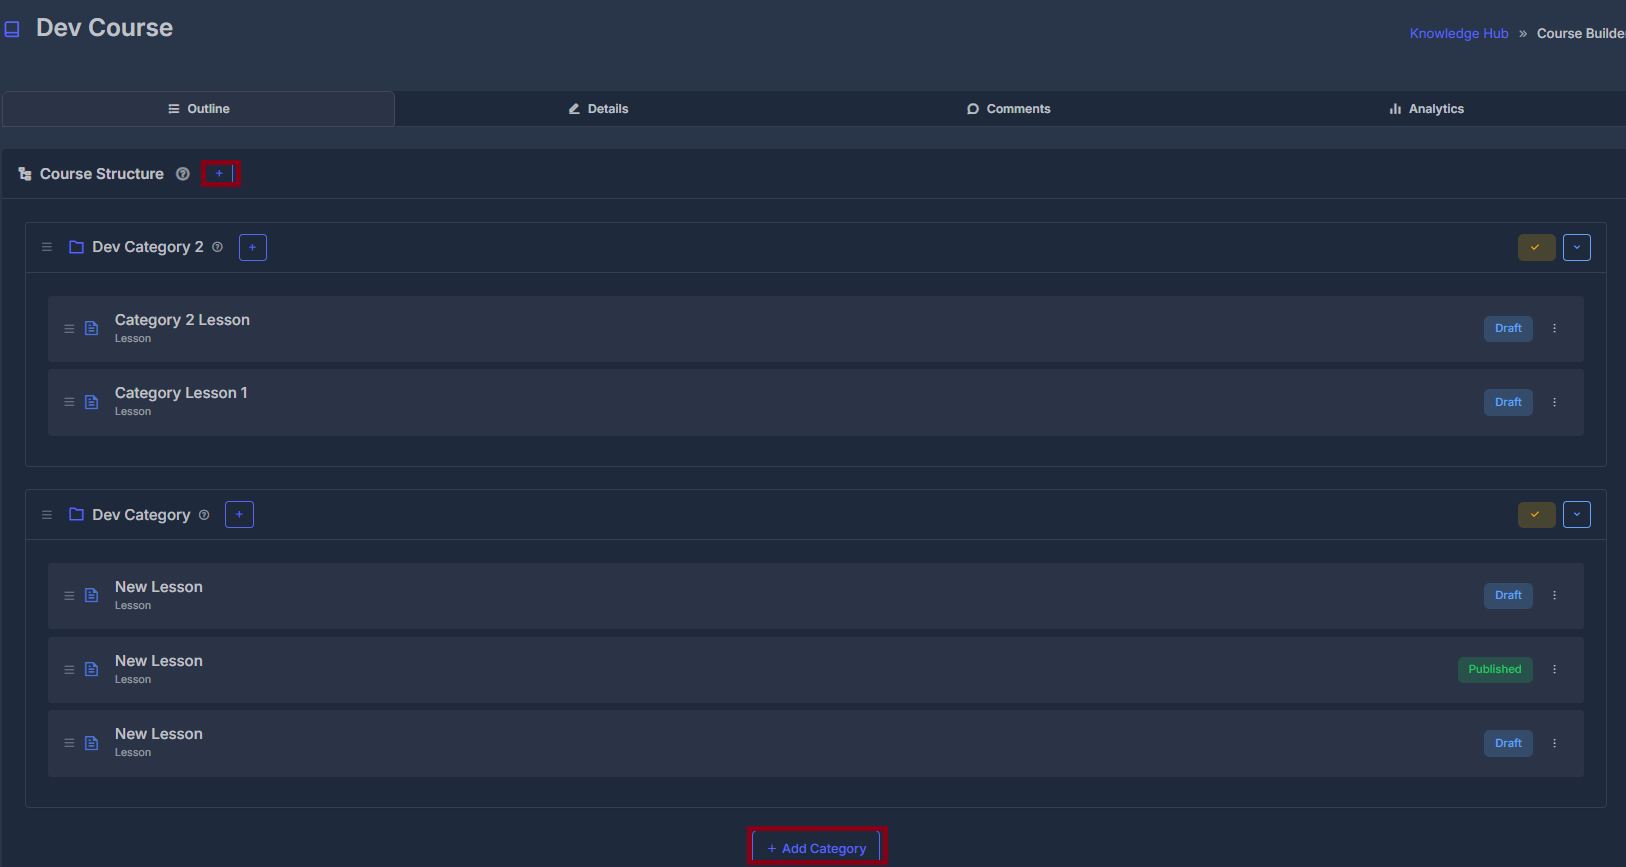 2. **Enter a Category Title**
* *Required* (up to 255 characters). Make it clear and inviting!
3. **Add a Short Description** *(Optional)*
* Briefly describe what this section covers.
4. **Choose Category Visibility**
* 📢 **Published**: Instantly visible to all assigned learners.
* 📝 **Draft**: Only visible to you until it's ready to launch!
5. **Customize Comments for Learners**
* 💬 **Enabled**: Allow discussion and feedback
* 🙈 **Hidden**: Hide comments from learners
* 🔒 **Locked**: Prevent all new comments
6. **Upload a Category Image** *(Optional)*
* Make your course visually engaging! Recommended size: **1280x720px** (thumbnail will display beautifully in the course outline).
2. **Enter a Category Title**
* *Required* (up to 255 characters). Make it clear and inviting!
3. **Add a Short Description** *(Optional)*
* Briefly describe what this section covers.
4. **Choose Category Visibility**
* 📢 **Published**: Instantly visible to all assigned learners.
* 📝 **Draft**: Only visible to you until it's ready to launch!
5. **Customize Comments for Learners**
* 💬 **Enabled**: Allow discussion and feedback
* 🙈 **Hidden**: Hide comments from learners
* 🔒 **Locked**: Prevent all new comments
6. **Upload a Category Image** *(Optional)*
* Make your course visually engaging! Recommended size: **1280x720px** (thumbnail will display beautifully in the course outline).
 **✨ What You Can Do With Categories:**
* Drag and reorder categories in your outline with an intuitive interface.
* Instantly see which categories are Published or Draft, thanks to clear status badges.
* Toggle comment options anytime to fit your learning environment.
#### 🟦 Reordering Feature
Quickly arrange course structure using drag-and-drop in the Course Builder!
**🔹 What Can Be Reordered?**
* **Categories**: Change their order in the overall course.
* **Content Items** *(inside a category)*: Reorder **Lessons**, **Quizzes**, and **Assignments**—mixing types in any sequence you like.
**🔹 How to Reorder Categories**
1. **Open Course Builder** and go to the **Outline** tab.
2. **Find the Category**, then grab the menu icon (☰) at its left.
3. **Drag and Drop** the category to your new spot. A highlight shows where it’ll go.
4. **Release**—the order updates instantly and auto-saves. A confirmation appears.
**✨ What You Can Do With Categories:**
* Drag and reorder categories in your outline with an intuitive interface.
* Instantly see which categories are Published or Draft, thanks to clear status badges.
* Toggle comment options anytime to fit your learning environment.
#### 🟦 Reordering Feature
Quickly arrange course structure using drag-and-drop in the Course Builder!
**🔹 What Can Be Reordered?**
* **Categories**: Change their order in the overall course.
* **Content Items** *(inside a category)*: Reorder **Lessons**, **Quizzes**, and **Assignments**—mixing types in any sequence you like.
**🔹 How to Reorder Categories**
1. **Open Course Builder** and go to the **Outline** tab.
2. **Find the Category**, then grab the menu icon (☰) at its left.
3. **Drag and Drop** the category to your new spot. A highlight shows where it’ll go.
4. **Release**—the order updates instantly and auto-saves. A confirmation appears.
 **Example:**
```
Before: After:
┌─────────────┐ ┌─────────────┐
│ Category A │ ← (☰) │ Category B │
└─────────────┘ └─────────────┘
┌─────────────┐ ┌─────────────┐
│ Category B │ │ Category A │
└─────────────┘ └─────────────┘
```
***
**Example:**
```
Before: After:
┌─────────────┐ ┌─────────────┐
│ Category A │ ← (☰) │ Category B │
└─────────────┘ └─────────────┘
┌─────────────┐ ┌─────────────┐
│ Category B │ │ Category A │
└─────────────┘ └─────────────┘
```
***
 **🔹 How to Reorder Content Items**
1. **Expand a Category** to see its items.
2. **Find an Item** and grab its menu icon (☰).
3. **Drag and Drop** anywhere in the list—even between Lessons, Quizzes, Assignments.
4. **Release**. The item instantly updates its spot and a success message confirms.
**Example:**
```
Before: After drag: (Quiz moved up)
├── Lesson 1: Getting Started ├── Quiz 1: Test Your Knowledge
├── Lesson 2: Basics ├── Lesson 1: Getting Started
├── Assessment 1: Test Your Knowledge ├── Lesson 2: Basics
└── Quiz 1: First Project └── Assignment 1: First Project
Now Assignment moved:
├── Quiz 1: Test Your Knowledge
├── Lesson 1: Getting Started
├── Assignment 1: First Project ← just drag & drop!
└── Lesson 2: Basics
```
> **Tip:** Use the menu (☰) handle to drag. Changes save right away—no button needed!
### 📝 Add Assessment
Assessments help measure learner understanding, reinforce material, and provide feedback within your course. You can add quizzes, tests, or other evaluation types to any category .
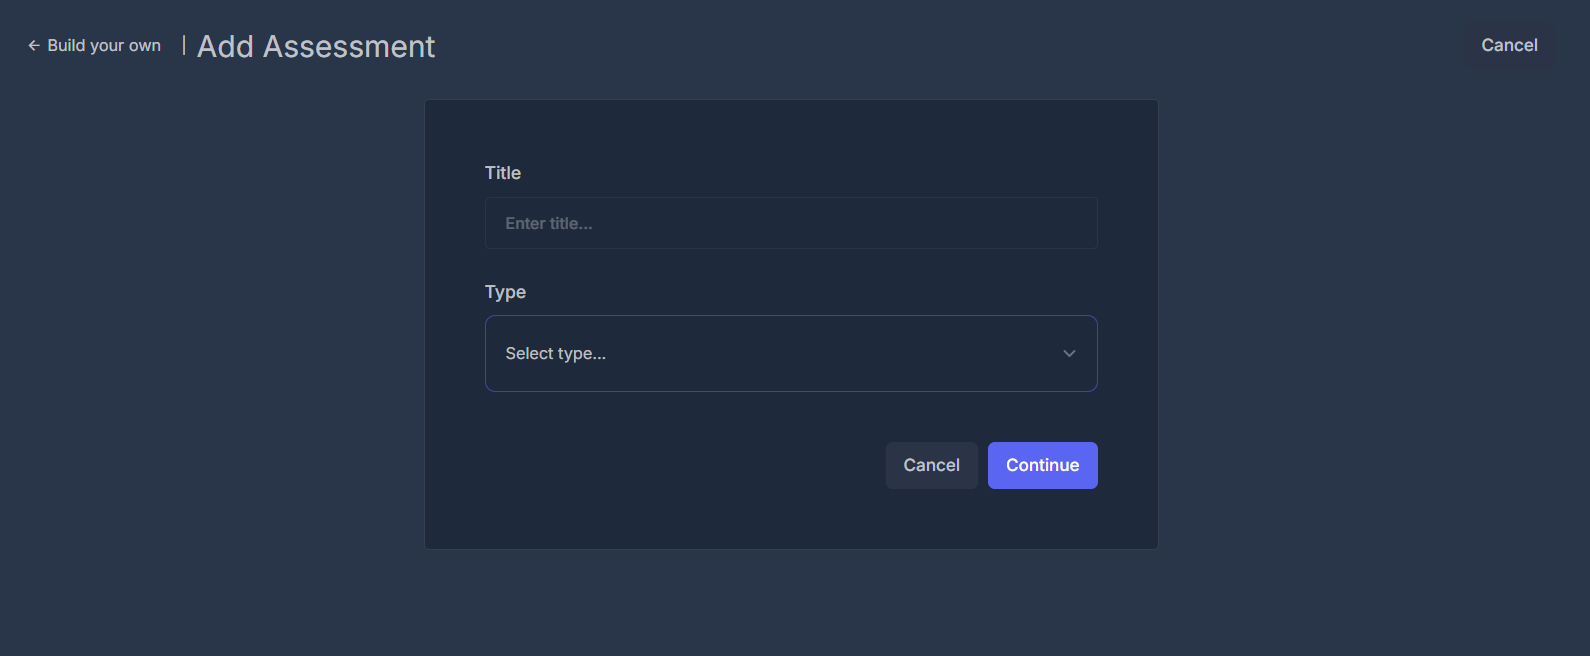
**How to Add an Assessment:**
1. **Click "Add Assessment"**\
In the Course Builder, look for the "Add Assessment" button within a category .
2. **Enter Assessment Title**
* *Required.*
* Choose a clear, descriptive title. (This appears to learners.)
3. **Select Assessment Type**
* Choose whether this assessment is a **Quiz** (for quick questions and knowledge checks) or an **Assignment** (open-ended or project-based submission).
* Use the dropdown menu to select either **Quiz** or **Assignment** as the assessment type.
4. **Continue**
* Once you've entered the title and selected the type, click **Continue** to proceed to the assessment editor.
* You can cancel at any time before saving.
**🔹 How to Reorder Content Items**
1. **Expand a Category** to see its items.
2. **Find an Item** and grab its menu icon (☰).
3. **Drag and Drop** anywhere in the list—even between Lessons, Quizzes, Assignments.
4. **Release**. The item instantly updates its spot and a success message confirms.
**Example:**
```
Before: After drag: (Quiz moved up)
├── Lesson 1: Getting Started ├── Quiz 1: Test Your Knowledge
├── Lesson 2: Basics ├── Lesson 1: Getting Started
├── Assessment 1: Test Your Knowledge ├── Lesson 2: Basics
└── Quiz 1: First Project └── Assignment 1: First Project
Now Assignment moved:
├── Quiz 1: Test Your Knowledge
├── Lesson 1: Getting Started
├── Assignment 1: First Project ← just drag & drop!
└── Lesson 2: Basics
```
> **Tip:** Use the menu (☰) handle to drag. Changes save right away—no button needed!
### 📝 Add Assessment
Assessments help measure learner understanding, reinforce material, and provide feedback within your course. You can add quizzes, tests, or other evaluation types to any category .
**How to Add an Assessment:**
1. **Click "Add Assessment"**\
In the Course Builder, look for the "Add Assessment" button within a category .
2. **Enter Assessment Title**
* *Required.*
* Choose a clear, descriptive title. (This appears to learners.)
3. **Select Assessment Type**
* Choose whether this assessment is a **Quiz** (for quick questions and knowledge checks) or an **Assignment** (open-ended or project-based submission).
* Use the dropdown menu to select either **Quiz** or **Assignment** as the assessment type.
4. **Continue**
* Once you've entered the title and selected the type, click **Continue** to proceed to the assessment editor.
* You can cancel at any time before saving.
 **Assessment Setup Tips:**
* After continuing, you'll be able to add questions, configure options, set time limits, and more.
* Learner results and attempts are tracked in analytics.
### ➕ Add Lesson
Lessons are the core building blocks of your course. Each lesson typically contains content such as text, images, videos, files, and more.
**How to Add a Lesson:**
1. **Click "Add Lesson"**\
In the Course Builder, navigate into a category where you want to add your lesson, and click the **Add Lesson** button.
2. **Complete Lesson Details**\
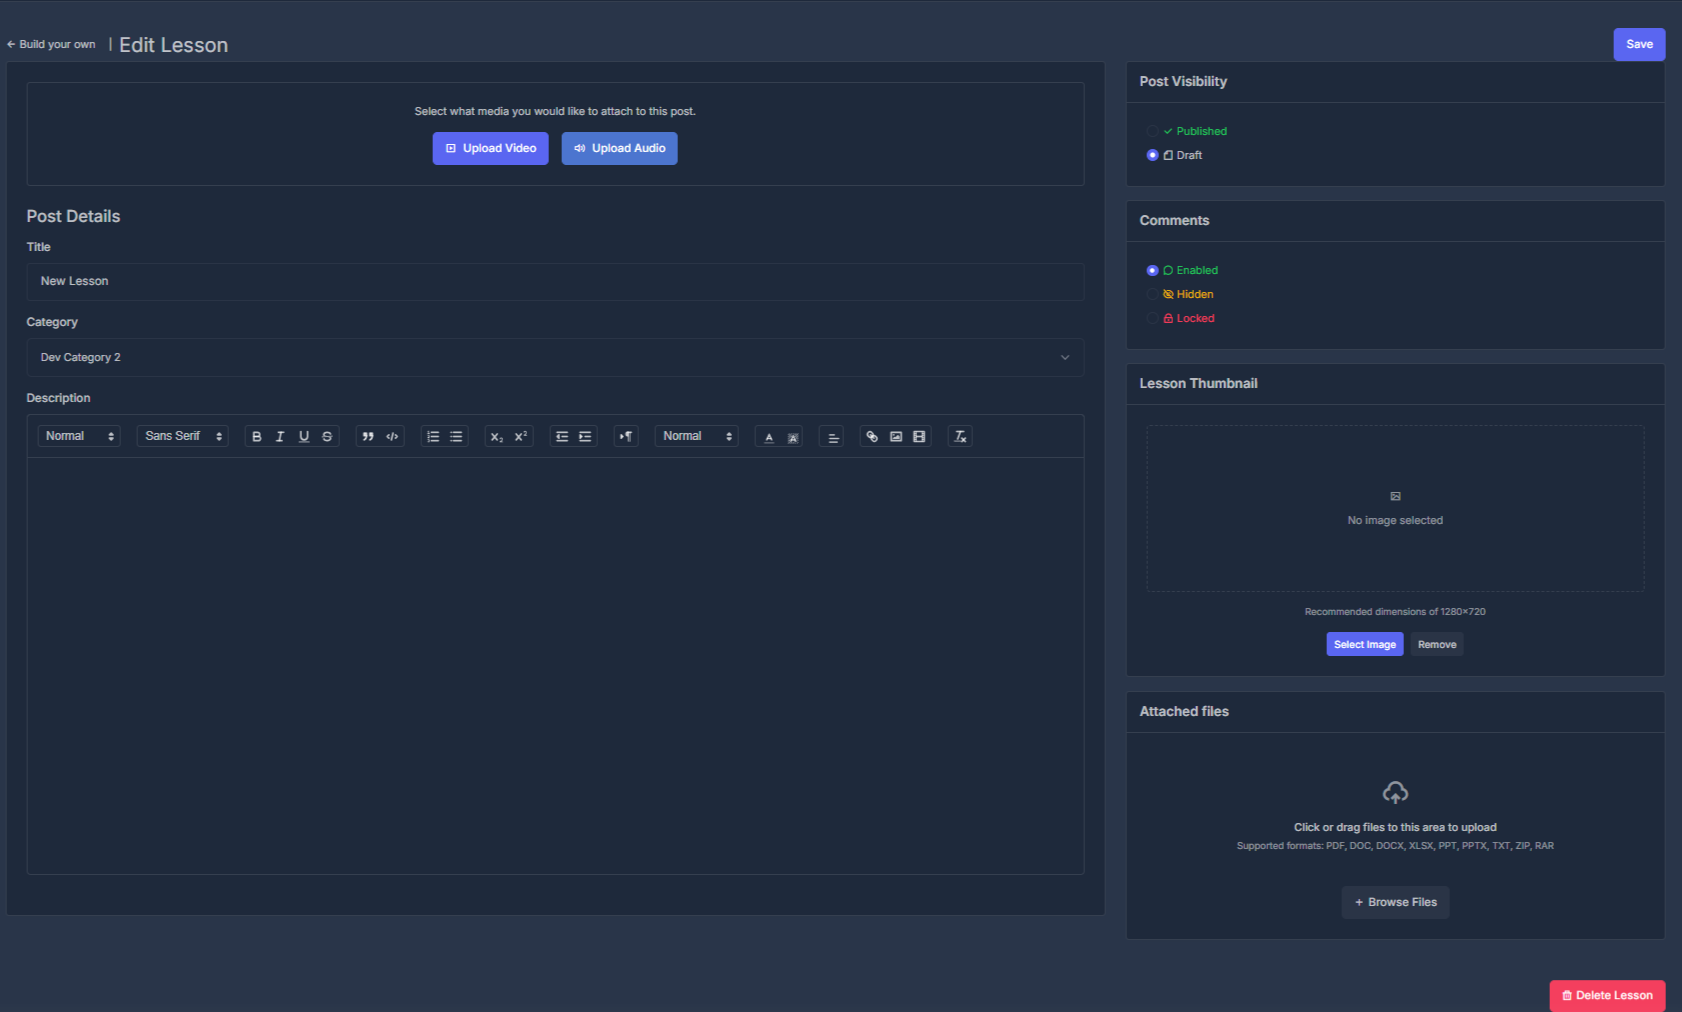
You’ll see the Lesson Editor interface (see screenshot below), where you can:
* **Enter the Lesson Title** (required)
* **Select the Category** the lesson belongs to
* **Write your lesson content** using the rich-text editor provided
* **Upload videos** or audio using the dedicated buttons at the top
3. **Configure Lesson Options**\
On the right panel, you can:
* Set **Lesson Visibility**
* 🟢 *Published*: Live for all assigned learners
* 📝 *Draft*: Only visible to you, not learners
* Configure **Comments** options
* 💬 Enabled: Allow comments
* 🙈 Hidden: Hide comments
* 🔒 Locked: No new comments allowed
* *Attach files* (optional): Upload PDFs or other resources
* *(Optional)* Set a **Lesson Thumbnail** to represent your lesson visually
4. **Save**\
When you have finished editing, click **Save** in the top-right corner to publish or draft the lesson.
**Assessment Setup Tips:**
* After continuing, you'll be able to add questions, configure options, set time limits, and more.
* Learner results and attempts are tracked in analytics.
### ➕ Add Lesson
Lessons are the core building blocks of your course. Each lesson typically contains content such as text, images, videos, files, and more.
**How to Add a Lesson:**
1. **Click "Add Lesson"**\
In the Course Builder, navigate into a category where you want to add your lesson, and click the **Add Lesson** button.
2. **Complete Lesson Details**\
You’ll see the Lesson Editor interface (see screenshot below), where you can:
* **Enter the Lesson Title** (required)
* **Select the Category** the lesson belongs to
* **Write your lesson content** using the rich-text editor provided
* **Upload videos** or audio using the dedicated buttons at the top
3. **Configure Lesson Options**\
On the right panel, you can:
* Set **Lesson Visibility**
* 🟢 *Published*: Live for all assigned learners
* 📝 *Draft*: Only visible to you, not learners
* Configure **Comments** options
* 💬 Enabled: Allow comments
* 🙈 Hidden: Hide comments
* 🔒 Locked: No new comments allowed
* *Attach files* (optional): Upload PDFs or other resources
* *(Optional)* Set a **Lesson Thumbnail** to represent your lesson visually
4. **Save**\
When you have finished editing, click **Save** in the top-right corner to publish or draft the lesson.
 **Quick Tips for Lessons:**
* Use the rich text editor to format content, embed images, or add code blocks.
* The **Upload Video** and **Upload Audio** buttons make it easy to add multimedia.
* Attach supporting resources such as handouts, slides, or reference docs as files.
* Published lessons become visible immediately to assigned learners if the course visibility permits.
**What You See in the Lesson Editor:**
* **Main Panel:** Enter title, category selection, and write rich lesson content
* **Sidebar:** Configure visibility, comments, upload thumbnail, attach files, and manage lesson-specific settings
## 🎮 Action Buttons & Functionality
**Primary Actions**
**Quick Tips for Lessons:**
* Use the rich text editor to format content, embed images, or add code blocks.
* The **Upload Video** and **Upload Audio** buttons make it easy to add multimedia.
* Attach supporting resources such as handouts, slides, or reference docs as files.
* Published lessons become visible immediately to assigned learners if the course visibility permits.
**What You See in the Lesson Editor:**
* **Main Panel:** Enter title, category selection, and write rich lesson content
* **Sidebar:** Configure visibility, comments, upload thumbnail, attach files, and manage lesson-specific settings
## 🎮 Action Buttons & Functionality
**Primary Actions**
 Each course in the table includes three main action buttons:
**Course Actions:**
* **Edit Course**: Modify course content and settings
* **Preview Course**: View course as learners see it
* **Delete Course**: Remove course permanently
## 👁️ Course Preview
When you click **Preview** in the Course Actions, you are shown an interactive preview of your course as potential learners will see it. The preview interface displays the full course navigation and content organization, allowing you to experience your course from the learner's perspective.
**Preview Interface Includes:**
* **Outline:** The main course structure, with expandable categories and lessons (see screenshot below).
* **Details:** Course information, description, objectives, and settings.
* **Comments:** Preview how course discussions and learner feedback will work.
* **Analytics:** See how progress and engagement stats will appear.
Each course in the table includes three main action buttons:
**Course Actions:**
* **Edit Course**: Modify course content and settings
* **Preview Course**: View course as learners see it
* **Delete Course**: Remove course permanently
## 👁️ Course Preview
When you click **Preview** in the Course Actions, you are shown an interactive preview of your course as potential learners will see it. The preview interface displays the full course navigation and content organization, allowing you to experience your course from the learner's perspective.
**Preview Interface Includes:**
* **Outline:** The main course structure, with expandable categories and lessons (see screenshot below).
* **Details:** Course information, description, objectives, and settings.
* **Comments:** Preview how course discussions and learner feedback will work.
* **Analytics:** See how progress and engagement stats will appear.
 ## 📝 Course Details
The **Course Details** section is where you define the key information for your course. This interface allows you to specify the course title, description, category, visibility, thumbnail image, and course status. These fields ensure your course is clearly presented and organized for both learners and administrators.
## 📝 Course Details
The **Course Details** section is where you define the key information for your course. This interface allows you to specify the course title, description, category, visibility, thumbnail image, and course status. These fields ensure your course is clearly presented and organized for both learners and administrators.
 **Course Details Interface Includes:**
* **Title**\
Enter a clear, descriptive name for your course.\
*Required. Maximum 140 characters.*\
*(Displayed at the top of the Course Details section, as shown in the screenshot)*
* **Description**\
Provide a brief summary of what this course covers.\
*Appears beneath the title on course landing and search pages.*
* **Course Visibility**\
Decide who can access your course:
* **Private**: Only assigned users can view and enroll. (Shown with a lock icon and selected by default in the screenshot.)
* When **Private** is selected and the course is saved, an **Assign** button appears in the **Analytics** tab, positioned to the right of the **Enrollments** section.
* Clicking **Assign** opens a modal listing all users in your company. You can select users and assign them to the course; they will then appear in the "Enrollment" modal.
* **Public**: Anyone with the link can view details and enroll.
* If the course is Public, the **Assign** functionality and button do **not** appear.
* **Course Thumbnail**\
Upload an image to represent your course visually.\
*Recommended: 1280x720px. Thumbnail appears on course catalog, overview, and at the top of the Course Details panel.*\
*(Example shown: “20% Sale” graphic)*
* **Course Status**\
Set your course’s current state:
* **Published**: Learners can view and access the course. (Status indicator appears in green in the screenshot.)
* **Draft**: Hidden from learners while you make edits.
You can also add or remove tags and assign the course to relevant categories for better organization.
**Course Details Interface Includes:**
* **Title**\
Enter a clear, descriptive name for your course.\
*Required. Maximum 140 characters.*\
*(Displayed at the top of the Course Details section, as shown in the screenshot)*
* **Description**\
Provide a brief summary of what this course covers.\
*Appears beneath the title on course landing and search pages.*
* **Course Visibility**\
Decide who can access your course:
* **Private**: Only assigned users can view and enroll. (Shown with a lock icon and selected by default in the screenshot.)
* When **Private** is selected and the course is saved, an **Assign** button appears in the **Analytics** tab, positioned to the right of the **Enrollments** section.
* Clicking **Assign** opens a modal listing all users in your company. You can select users and assign them to the course; they will then appear in the "Enrollment" modal.
* **Public**: Anyone with the link can view details and enroll.
* If the course is Public, the **Assign** functionality and button do **not** appear.
* **Course Thumbnail**\
Upload an image to represent your course visually.\
*Recommended: 1280x720px. Thumbnail appears on course catalog, overview, and at the top of the Course Details panel.*\
*(Example shown: “20% Sale” graphic)*
* **Course Status**\
Set your course’s current state:
* **Published**: Learners can view and access the course. (Status indicator appears in green in the screenshot.)
* **Draft**: Hidden from learners while you make edits.
You can also add or remove tags and assign the course to relevant categories for better organization.
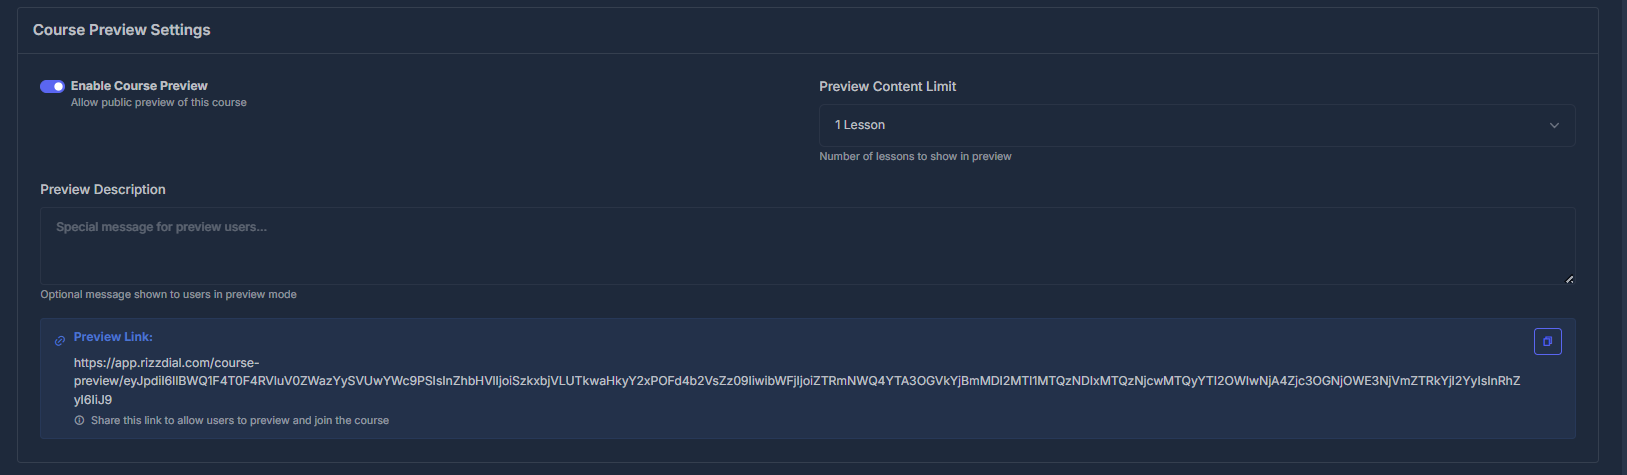 * A toggle to enable or disable course preview mode (`Enable Course Preview`)
* A numeric field showing the number of previewable lessons (labeled `Preview Criteria Limit`, here set to 1 Lesson)
* A text area for providing a `Preview Description` so you can specify details visible in preview mode
* A `Preview Link` field containing a shareable course preview URL, along with a copy-to-clipboard button for easy sharing
This layout allows you to control and customize how and what parts of your course are shown during preview, set limits on accessible lessons, describe the preview for viewers, and quickly share preview access.
## 💬 Comments
> **Note:**\
> The **Comments** tab is currently under development. This feature will soon enable discussion, feedback, and social learning directly within each course. Stay tuned for updates!
> //
## 📊 Course Analytics
The **Analytics** tab in the Course Builder offers a comprehensive overview of learner engagement and course effectiveness. It provides key insights into enrollment, completion rates, and individual learner progress, helping you monitor outcomes and identify areas for improvement.
* A toggle to enable or disable course preview mode (`Enable Course Preview`)
* A numeric field showing the number of previewable lessons (labeled `Preview Criteria Limit`, here set to 1 Lesson)
* A text area for providing a `Preview Description` so you can specify details visible in preview mode
* A `Preview Link` field containing a shareable course preview URL, along with a copy-to-clipboard button for easy sharing
This layout allows you to control and customize how and what parts of your course are shown during preview, set limits on accessible lessons, describe the preview for viewers, and quickly share preview access.
## 💬 Comments
> **Note:**\
> The **Comments** tab is currently under development. This feature will soon enable discussion, feedback, and social learning directly within each course. Stay tuned for updates!
> //
## 📊 Course Analytics
The **Analytics** tab in the Course Builder offers a comprehensive overview of learner engagement and course effectiveness. It provides key insights into enrollment, completion rates, and individual learner progress, helping you monitor outcomes and identify areas for improvement.
 **Course Analytics Dashboard Includes:**
* **Top Metrics Cards**
* **Total Lessons**: The number of lessons included in the course.
* **Enrolled Learners**: How many users are enrolled in the course.
* **Completed**: The number of users who have fully completed the course.
* **Completion Rate**: Percentage of learners who have finished all required assessments.
* **Course Progress**
* Visual progress bar showing aggregate progress across all learners.
* Example: "Completed: 1 | In Progress: 0" indicates the status breakdown.
* **Course Status**
* Instant snapshot of whether the course is **Published** or **Draft**.
* Visibility indicator for Public or Private access.
* Displays creation and published dates.
### 👥 Enrollments & Learner List
The **Analytics** tab also provides a detailed overview of user enrollments within each course. You will see a table displaying all users currently enrolled, their progress, status, enrollment dates, and recent activity.
**Course Analytics Dashboard Includes:**
* **Top Metrics Cards**
* **Total Lessons**: The number of lessons included in the course.
* **Enrolled Learners**: How many users are enrolled in the course.
* **Completed**: The number of users who have fully completed the course.
* **Completion Rate**: Percentage of learners who have finished all required assessments.
* **Course Progress**
* Visual progress bar showing aggregate progress across all learners.
* Example: "Completed: 1 | In Progress: 0" indicates the status breakdown.
* **Course Status**
* Instant snapshot of whether the course is **Published** or **Draft**.
* Visibility indicator for Public or Private access.
* Displays creation and published dates.
### 👥 Enrollments & Learner List
The **Analytics** tab also provides a detailed overview of user enrollments within each course. You will see a table displaying all users currently enrolled, their progress, status, enrollment dates, and recent activity.
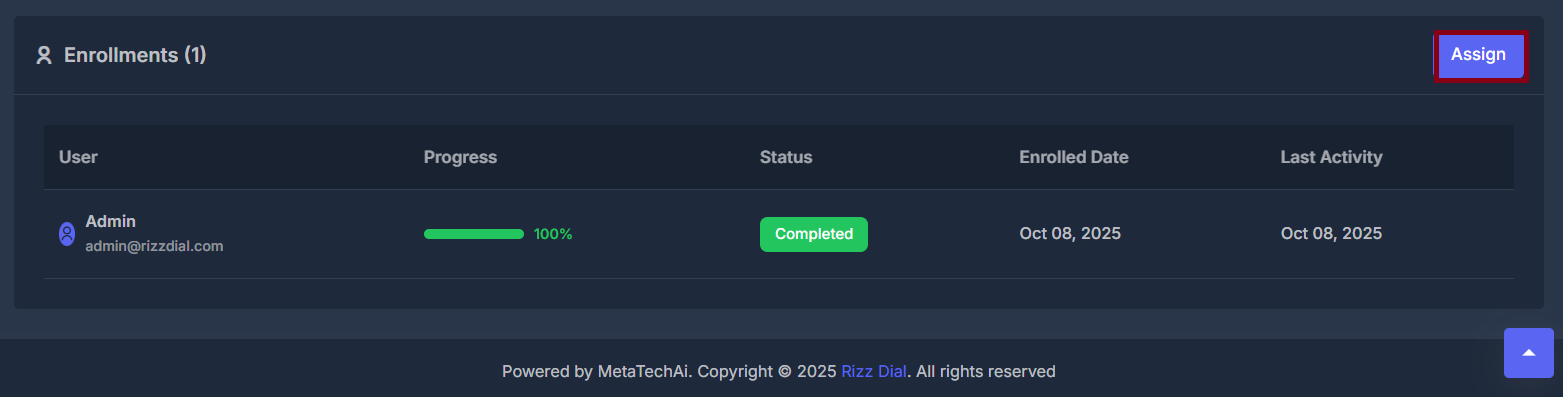 **Enrollment Table Columns:**
* **User**: The learner's name and email address, along with their avatar.
* **Progress**: A visual progress bar and percentage for how much of the course they've completed.
* **Status**: Indicates whether the learner has completed, is in progress, or not started. (e.g., "Completed")
* **Enrolled Date**: The date the learner was added to the course.
* **Last Activity**: The most recent date the learner interacted with the course.
> **Assign Button:**\
> The blue **Assign** button (top right) is only visible when the course is set as **Private**. This allows you to manually assign the course to specific users or companies.\
> If the course is **Public**, the Assign button will not appear, as anyone with access can enroll themselves.
When you click the **Assign** button for a Private course, an **"Assign Course"** dialog appears, as shown below:
**Enrollment Table Columns:**
* **User**: The learner's name and email address, along with their avatar.
* **Progress**: A visual progress bar and percentage for how much of the course they've completed.
* **Status**: Indicates whether the learner has completed, is in progress, or not started. (e.g., "Completed")
* **Enrolled Date**: The date the learner was added to the course.
* **Last Activity**: The most recent date the learner interacted with the course.
> **Assign Button:**\
> The blue **Assign** button (top right) is only visible when the course is set as **Private**. This allows you to manually assign the course to specific users or companies.\
> If the course is **Public**, the Assign button will not appear, as anyone with access can enroll themselves.
When you click the **Assign** button for a Private course, an **"Assign Course"** dialog appears, as shown below:
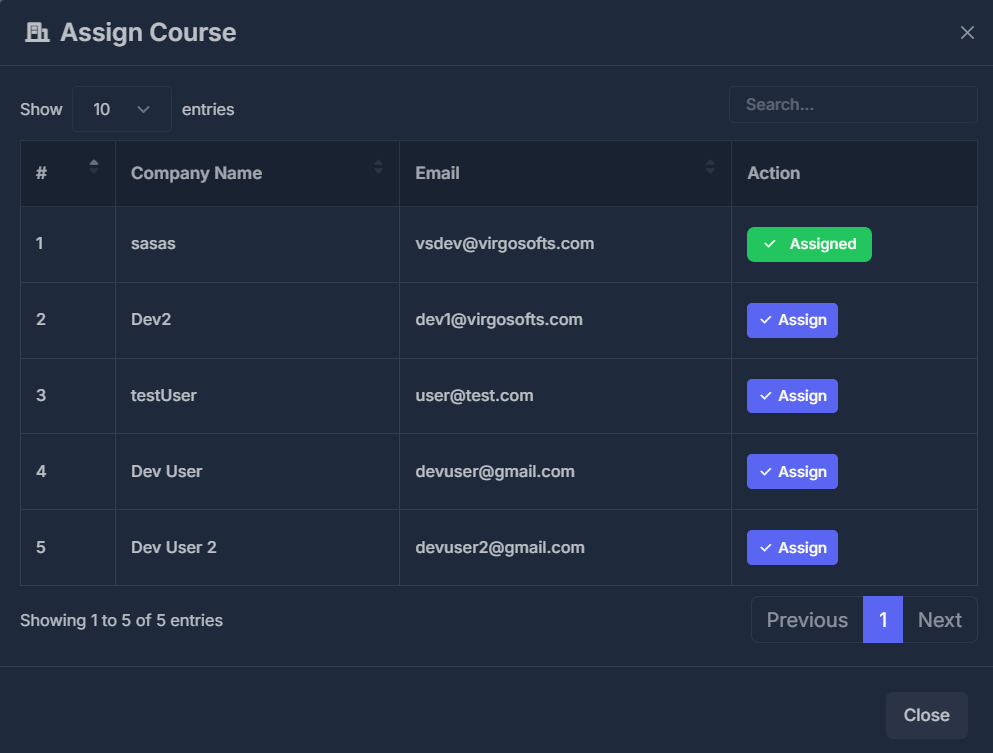 > **Example: Assign Course Dialog**\
> The dialog features a dark-themed table for selecting users or companies to assign a course.
>
> * **Controls:**
> * Entries per page dropdown (e.g., Show 10 entries)
> * Search field for filtering by name/email
> * **Table Columns:**
> * **Company Name**
> * **Email**
> * **Action** — a blue **Assign** button for users not yet assigned , Click button to assign , or a green **Assigned** badge for already assigned users.
> * **Pagination:** Controls at the bottom (Previous, Next, current page highlighted)
> * **Close** button at the bottom right.
This dashboard equips course administrators and instructors with the real-time data needed to track learner progress, celebrate completions, and support those needing help—ensuring a successful learning experience for everyone involved.
> **Example: Assign Course Dialog**\
> The dialog features a dark-themed table for selecting users or companies to assign a course.
>
> * **Controls:**
> * Entries per page dropdown (e.g., Show 10 entries)
> * Search field for filtering by name/email
> * **Table Columns:**
> * **Company Name**
> * **Email**
> * **Action** — a blue **Assign** button for users not yet assigned , Click button to assign , or a green **Assigned** badge for already assigned users.
> * **Pagination:** Controls at the bottom (Previous, Next, current page highlighted)
> * **Close** button at the bottom right.
This dashboard equips course administrators and instructors with the real-time data needed to track learner progress, celebrate completions, and support those needing help—ensuring a successful learning experience for everyone involved.