> ## Documentation Index
> Fetch the complete documentation index at: https://docs.aisync.link/llms.txt
> Use this file to discover all available pages before exploring further.
# Import Contacts
This guide walks through the import process step by step from a user point of view.
## ✨ What you can do
* Upload contacts from a CSV file.
* Match CSV columns to contact fields.
* Create new contact fields for extra CSV columns.
* Review how many contacts will be imported or skipped.
* Confirm consent before importing contacts.
* Apply existing or new tags to imported contacts.
* Choose how duplicate phone numbers should be handled.
* Add contacts directly to Contacts.
* Optionally create a new powerlist for AI dialing or manual dialing.
* Track import progress while the file is being processed.
## 🪜 Import Steps
The import process is organized into six main steps:
| Step | What it does |
| ---------------- | ------------------------------------------------- |
| **1. Upload** | Choose and upload your CSV file. |
| **2. Map** | Match CSV columns to contact fields. |
| **3. Review** | Preview what will be imported or skipped. |
| **4. Consent** | Confirm contacts have permission to be contacted. |
| **5. Tags** | Apply tags and choose duplicate handling. |
| **6. Powerlist** | Decide where imported contacts should go. |
Each step helps you prepare the contact list before the final import.
## 1️⃣ Step 1 — Upload CSV
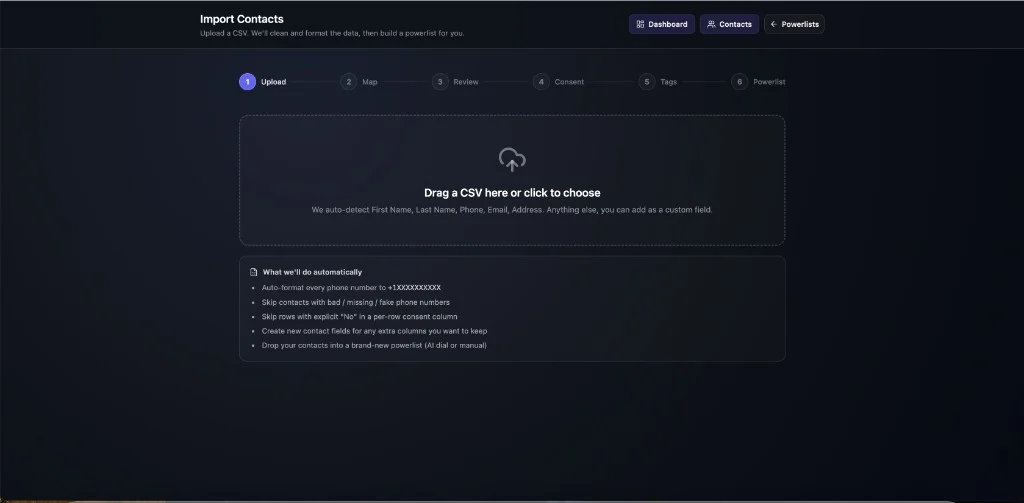
Start by dragging a CSV file into the upload area or clicking the upload box to choose a file from your computer.
 **📄 File requirements**
* The file must include a **header row** — for example `Phone`, `First Name`, `Last Name`, `Email`, `City`, or other column names.
* The importer uses these headers to understand what each column means.
* If the file has no header row or no contact rows, the system shows an error and asks you to upload a valid file.
**🧭 Top navigation**
While importing, you can jump to **Dashboard**, **Contacts**, or **Powerlists** from the top-right buttons without losing your place in the wizard.
**What the system cleans automatically**
During import, the system helps clean your file by:
| Action | What happens |
| -------------------- | -------------------------------------------------------------------------- |
| **Phone formatting** | Formats phone numbers into a dialable format (for example `+1XXXXXXXXXX`). |
| **Missing phones** | Skips contacts with no phone number. |
| **Invalid phones** | Skips contacts with invalid or fake phone numbers. |
| **Consent rows** | Skips rows marked as not consenting when a consent column is selected. |
| **Extra columns** | Keeps useful extra data when you choose to create new contact fields. |
## 2️⃣ Step 2 — Map fields
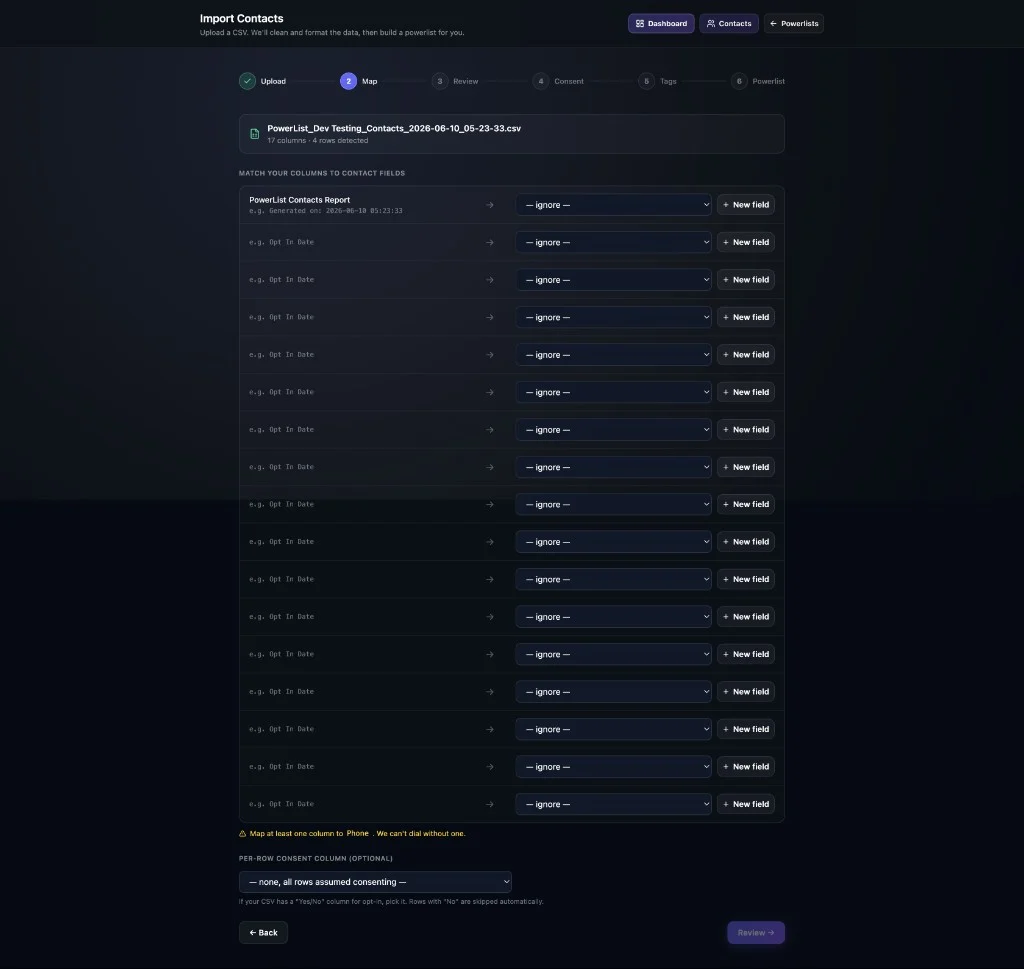
After the file is uploaded, the system shows the columns found in your CSV. Match each column to a contact field, ignore it, or save it as a new field.
**📄 File requirements**
* The file must include a **header row** — for example `Phone`, `First Name`, `Last Name`, `Email`, `City`, or other column names.
* The importer uses these headers to understand what each column means.
* If the file has no header row or no contact rows, the system shows an error and asks you to upload a valid file.
**🧭 Top navigation**
While importing, you can jump to **Dashboard**, **Contacts**, or **Powerlists** from the top-right buttons without losing your place in the wizard.
**What the system cleans automatically**
During import, the system helps clean your file by:
| Action | What happens |
| -------------------- | -------------------------------------------------------------------------- |
| **Phone formatting** | Formats phone numbers into a dialable format (for example `+1XXXXXXXXXX`). |
| **Missing phones** | Skips contacts with no phone number. |
| **Invalid phones** | Skips contacts with invalid or fake phone numbers. |
| **Consent rows** | Skips rows marked as not consenting when a consent column is selected. |
| **Extra columns** | Keeps useful extra data when you choose to create new contact fields. |
## 2️⃣ Step 2 — Map fields
After the file is uploaded, the system shows the columns found in your CSV. Match each column to a contact field, ignore it, or save it as a new field.
 **📋 File summary**
At the top of the mapping step, you see the uploaded file name and a quick count — for example **17 columns • 4 rows detected**.
**🗂️ Standard contact fields**
You can match CSV columns to fields such as:
| Field | Example CSV header |
| -------------- | ------------------------- |
| **Phone** | `Phone`, `Mobile`, `Cell` |
| **First name** | `First Name`, `FirstName` |
| **Last name** | `Last Name`, `LastName` |
| **Email** | `Email`, `Email Address` |
| **Address** | `Address`, `Street` |
| **City** | `City` |
| **State** | `State` |
| **Zip** | `Zip`, `Postal Code` |
The system tries to **auto-detect** common fields, especially phone number, name, and email. Change the mapping if the system selected the wrong field.
**🔽 Mapping options per column**
For each CSV column, use the dropdown to:
* Map it to an existing contact field.
* Choose **— ignore —** to skip that column.
* Select **+ New field** to create a custom contact field and keep that data.
**Phone field requirement**
At least one CSV column must be mapped to **Phone**. Contacts cannot be imported for calling without a phone number.
If no phone column is mapped, a warning appears:
> Map at least one column to Phone. We can't dial without one.
The **Review** button stays disabled until a phone column is mapped.
The system also checks how many rows have valid phone numbers. If the selected phone column looks mostly empty or invalid, the importer warns you and may suggest a better column.
**Creating new contact fields**
If your CSV has extra columns that do not match existing contact fields, save them as new contact fields during the mapping step.
**Examples of useful custom fields:**
* Lead Source
* Insurance Type
* Appointment Date
* Customer Stage
Click **+ New field** next to any column to create and map a custom field in one step.
**Optional per-row consent Columns**
If your CSV includes a consent or opt-in column, select it in the **Per-row consent column (optional)** dropdown at the bottom of the mapping step.
| Value in CSV | Result |
| ---------------------------------------------------------- | ----------------------------- |
| **Yes**, **True**, **1**, **Y**, **Consent**, **Opted-in** | Row is allowed. |
| **No** or any non-consenting value | Row is skipped automatically. |
If your file does not have a consent column, leave this set to **— none, all rows assumed consenting —** and continue with the main consent confirmation in Step 4.
## 3️⃣ Step 3 — Review cleanup
The review step shows a preview of what will happen before the import begins.
**You will see:**
* How many contacts will be imported.
* How many rows will be cleaned out or skipped.
* The total number of rows in the file.
* A cleanup breakdown for missing phone numbers, invalid phone numbers, and non-consenting rows.
* A small sample of clean rows that are ready to import.
* Any new fields that will be created.
Use this step to make sure the import looks correct before continuing. Select **Back** to adjust mapping, or continue when the preview looks right.
## 4️⃣ Step 4 — Consent confirmation
Before importing, you must confirm that the contacts have given permission to receive communications from your business.
This confirmation is required because calls, SMS, and marketing communication may be subject to **TCPA** and carrier compliance rules.
You cannot continue until the consent checkbox is selected.
## 5️⃣ Step 5 — Tags and duplicates
The tags and duplicates step lets you organize contacts and decide how the system should handle existing phone numbers.
**Applying tags**
You can apply existing tags to all imported contacts. You can also create new tags during the import.
Tags help you:
* Find contacts later.
* Organize lists.
* Trigger automations or workflows.
**Duplicate handling**
Duplicates are matched by **phone number**. Choose one of three options:
| Option | What happens |
| --------------------- | ---------------------------------------------------------------------------------------- |
| **Skip duplicates** | If the phone number already exists, the row is ignored. |
| **Update existing** | If the phone number already exists, the existing contact is refreshed with the new data. |
| **Always create new** | The system creates a new contact even if the same phone number already exists. |
For most imports, **Skip duplicates** or **Update existing** is recommended.
## 6️⃣ Step 6 — Powerlist
After contacts are prepared, choose where they should go.
| Option | What happens |
| ---------------------------------- | --------------------------------------------------------------------------- |
| **Create a powerlist for dialing** | Contacts are imported and grouped into a new powerlist. |
| **Just add to Contacts** | Contacts are imported into your Contacts list without creating a powerlist. |
**Creating a powerlist**
If you choose to create a powerlist:
1. Enter a **powerlist name**. The system may pre-fill the name based on your file name, but you can edit it.
2. Choose how the powerlist should be used:
| Dial mode | Description |
| --------------- | ------------------------------------------------------------ |
| **AI Dial** | An AI voice agent calls the contacts automatically. |
| **Manual Dial** | Your team dials the contacts manually from the power dialer. |
If you select **AI Dial**, you must choose an active **AI voice agent**.
## ✅ Import complete
When the import finishes, the success screen shows a summary.
The summary may include:
* Number of contacts imported.
* Number of existing contacts updated.
* Number of rows cleaned out.
* Destination — for example Contacts, Manual powerlist, or AI Dial powerlist.
From there, you can view the powerlist, build automation, or import another file.
## 🚫 Rows that may be skipped
Some rows may not be imported. Common reasons include:
| Reason | When it happens |
| ------------------------- | ---------------------------------------------------------------------- |
| **No phone number** | The row has an empty phone field. |
| **Invalid or fake phone** | The number cannot be formatted or dialed. |
| **No consent** | The selected consent column says the contact did not opt in. |
| **Duplicate skipped** | The phone number already exists and duplicate handling is set to skip. |
The review and progress screens help you understand why rows were cleaned out.
**📋 File summary**
At the top of the mapping step, you see the uploaded file name and a quick count — for example **17 columns • 4 rows detected**.
**🗂️ Standard contact fields**
You can match CSV columns to fields such as:
| Field | Example CSV header |
| -------------- | ------------------------- |
| **Phone** | `Phone`, `Mobile`, `Cell` |
| **First name** | `First Name`, `FirstName` |
| **Last name** | `Last Name`, `LastName` |
| **Email** | `Email`, `Email Address` |
| **Address** | `Address`, `Street` |
| **City** | `City` |
| **State** | `State` |
| **Zip** | `Zip`, `Postal Code` |
The system tries to **auto-detect** common fields, especially phone number, name, and email. Change the mapping if the system selected the wrong field.
**🔽 Mapping options per column**
For each CSV column, use the dropdown to:
* Map it to an existing contact field.
* Choose **— ignore —** to skip that column.
* Select **+ New field** to create a custom contact field and keep that data.
**Phone field requirement**
At least one CSV column must be mapped to **Phone**. Contacts cannot be imported for calling without a phone number.
If no phone column is mapped, a warning appears:
> Map at least one column to Phone. We can't dial without one.
The **Review** button stays disabled until a phone column is mapped.
The system also checks how many rows have valid phone numbers. If the selected phone column looks mostly empty or invalid, the importer warns you and may suggest a better column.
**Creating new contact fields**
If your CSV has extra columns that do not match existing contact fields, save them as new contact fields during the mapping step.
**Examples of useful custom fields:**
* Lead Source
* Insurance Type
* Appointment Date
* Customer Stage
Click **+ New field** next to any column to create and map a custom field in one step.
**Optional per-row consent Columns**
If your CSV includes a consent or opt-in column, select it in the **Per-row consent column (optional)** dropdown at the bottom of the mapping step.
| Value in CSV | Result |
| ---------------------------------------------------------- | ----------------------------- |
| **Yes**, **True**, **1**, **Y**, **Consent**, **Opted-in** | Row is allowed. |
| **No** or any non-consenting value | Row is skipped automatically. |
If your file does not have a consent column, leave this set to **— none, all rows assumed consenting —** and continue with the main consent confirmation in Step 4.
## 3️⃣ Step 3 — Review cleanup
The review step shows a preview of what will happen before the import begins.
**You will see:**
* How many contacts will be imported.
* How many rows will be cleaned out or skipped.
* The total number of rows in the file.
* A cleanup breakdown for missing phone numbers, invalid phone numbers, and non-consenting rows.
* A small sample of clean rows that are ready to import.
* Any new fields that will be created.
Use this step to make sure the import looks correct before continuing. Select **Back** to adjust mapping, or continue when the preview looks right.
## 4️⃣ Step 4 — Consent confirmation
Before importing, you must confirm that the contacts have given permission to receive communications from your business.
This confirmation is required because calls, SMS, and marketing communication may be subject to **TCPA** and carrier compliance rules.
You cannot continue until the consent checkbox is selected.
## 5️⃣ Step 5 — Tags and duplicates
The tags and duplicates step lets you organize contacts and decide how the system should handle existing phone numbers.
**Applying tags**
You can apply existing tags to all imported contacts. You can also create new tags during the import.
Tags help you:
* Find contacts later.
* Organize lists.
* Trigger automations or workflows.
**Duplicate handling**
Duplicates are matched by **phone number**. Choose one of three options:
| Option | What happens |
| --------------------- | ---------------------------------------------------------------------------------------- |
| **Skip duplicates** | If the phone number already exists, the row is ignored. |
| **Update existing** | If the phone number already exists, the existing contact is refreshed with the new data. |
| **Always create new** | The system creates a new contact even if the same phone number already exists. |
For most imports, **Skip duplicates** or **Update existing** is recommended.
## 6️⃣ Step 6 — Powerlist
After contacts are prepared, choose where they should go.
| Option | What happens |
| ---------------------------------- | --------------------------------------------------------------------------- |
| **Create a powerlist for dialing** | Contacts are imported and grouped into a new powerlist. |
| **Just add to Contacts** | Contacts are imported into your Contacts list without creating a powerlist. |
**Creating a powerlist**
If you choose to create a powerlist:
1. Enter a **powerlist name**. The system may pre-fill the name based on your file name, but you can edit it.
2. Choose how the powerlist should be used:
| Dial mode | Description |
| --------------- | ------------------------------------------------------------ |
| **AI Dial** | An AI voice agent calls the contacts automatically. |
| **Manual Dial** | Your team dials the contacts manually from the power dialer. |
If you select **AI Dial**, you must choose an active **AI voice agent**.
## ✅ Import complete
When the import finishes, the success screen shows a summary.
The summary may include:
* Number of contacts imported.
* Number of existing contacts updated.
* Number of rows cleaned out.
* Destination — for example Contacts, Manual powerlist, or AI Dial powerlist.
From there, you can view the powerlist, build automation, or import another file.
## 🚫 Rows that may be skipped
Some rows may not be imported. Common reasons include:
| Reason | When it happens |
| ------------------------- | ---------------------------------------------------------------------- |
| **No phone number** | The row has an empty phone field. |
| **Invalid or fake phone** | The number cannot be formatted or dialed. |
| **No consent** | The selected consent column says the contact did not opt in. |
| **Duplicate skipped** | The phone number already exists and duplicate handling is set to skip. |
The review and progress screens help you understand why rows were cleaned out.