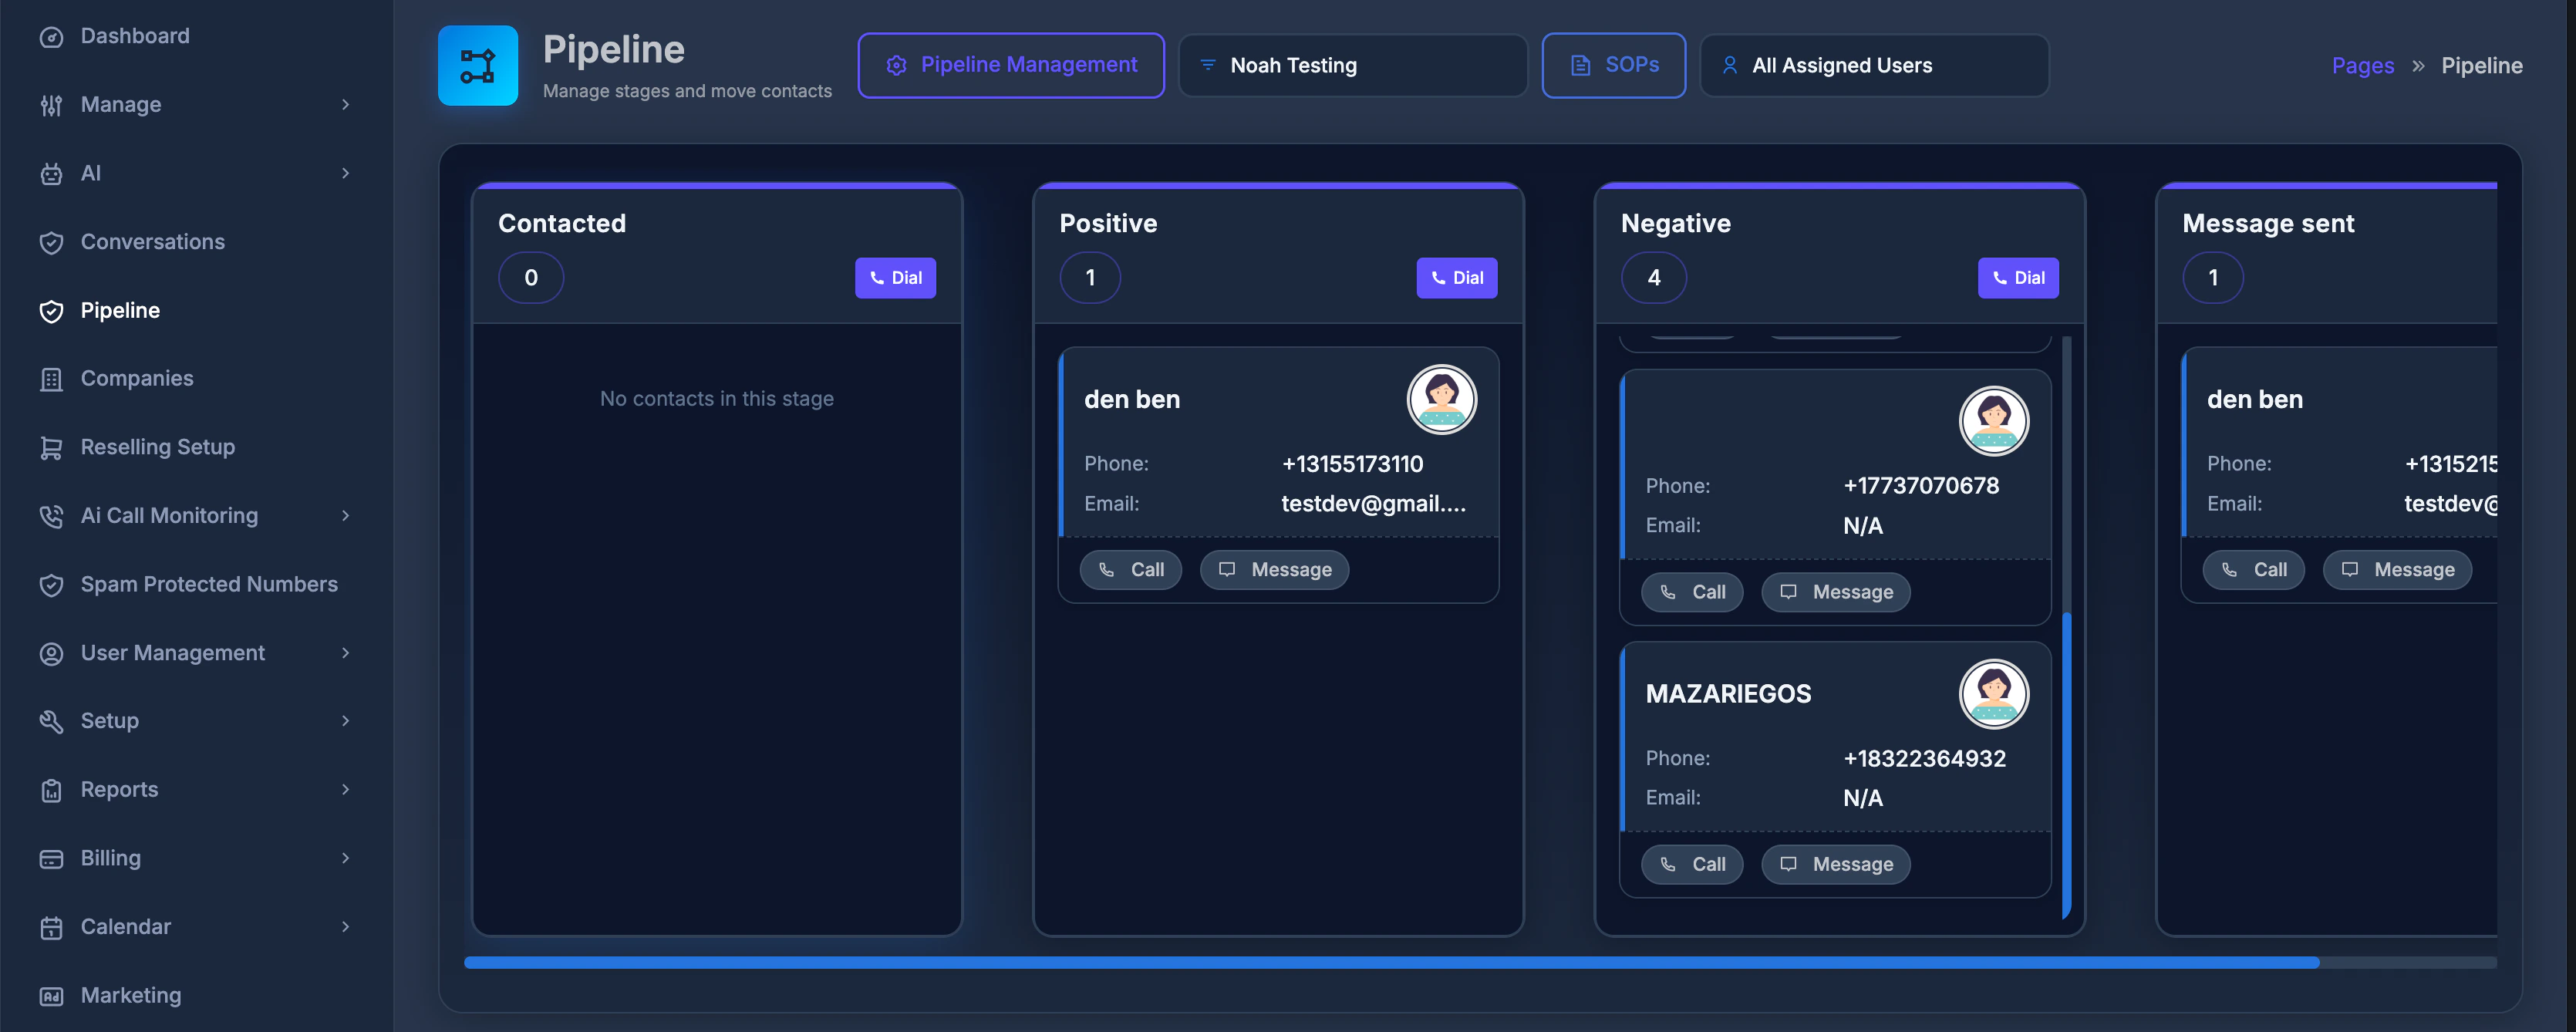
Pipeline Overview: The Pipeline Board provides a visual workflow representation, showing all items as they move through each stage (such as New Lead, Contacted, Proposal Sent, Closed). This helps your team track and manage the progress of every item in your business processes at a glance.
Assigned User Dropdown: At the top of the Pipeline, you’ll find an “Assigned User” dropdown. This control lets you view pipeline items for a specific user or choose “All Users” to see everything in the pipeline. Select an individual to filter and focus on their assigned work or reset to “All Users” to get a broader view of your entire team’s progress.
🎯 What Is the Pipeline Module?
The Pipeline Module allows you to design, monitor, and adjust your business processes with ease. 🔗 The Concept of a Pipeline A pipeline is a full sequence of steps or phases representing a business process. For example:- A sales pipeline: “Sales Process”
- A project pipeline: “Project Delivery”
- An onboarding pipeline: “Customer Onboarding”
- New Lead
- Contacted
- Proposal Sent
- Closed
- Create a pipeline – Give your workflow a descriptive name.
- Add stages – Name each stage clearly to represent its function within your process.
- Visual Board – Your pipeline and its stages are displayed in a Kanban-style board, making it simple to visualize progression and spot bottlenecks.
- Go to the Pipeline section from your main navigation menu.
- The page opens with the core Pipeline interface, showing several key controls at the top.
- Pipeline Management – manage, create, and edit your pipelines.
- Pipeline Selector Dropdown – switch between different pipelines.
- SOPs Button – read standards and best practices.
- Visual Board or Message – Displays your active pipelines, or “No Pipeline Created” if none exist.
➕ How to Create a Pipeline
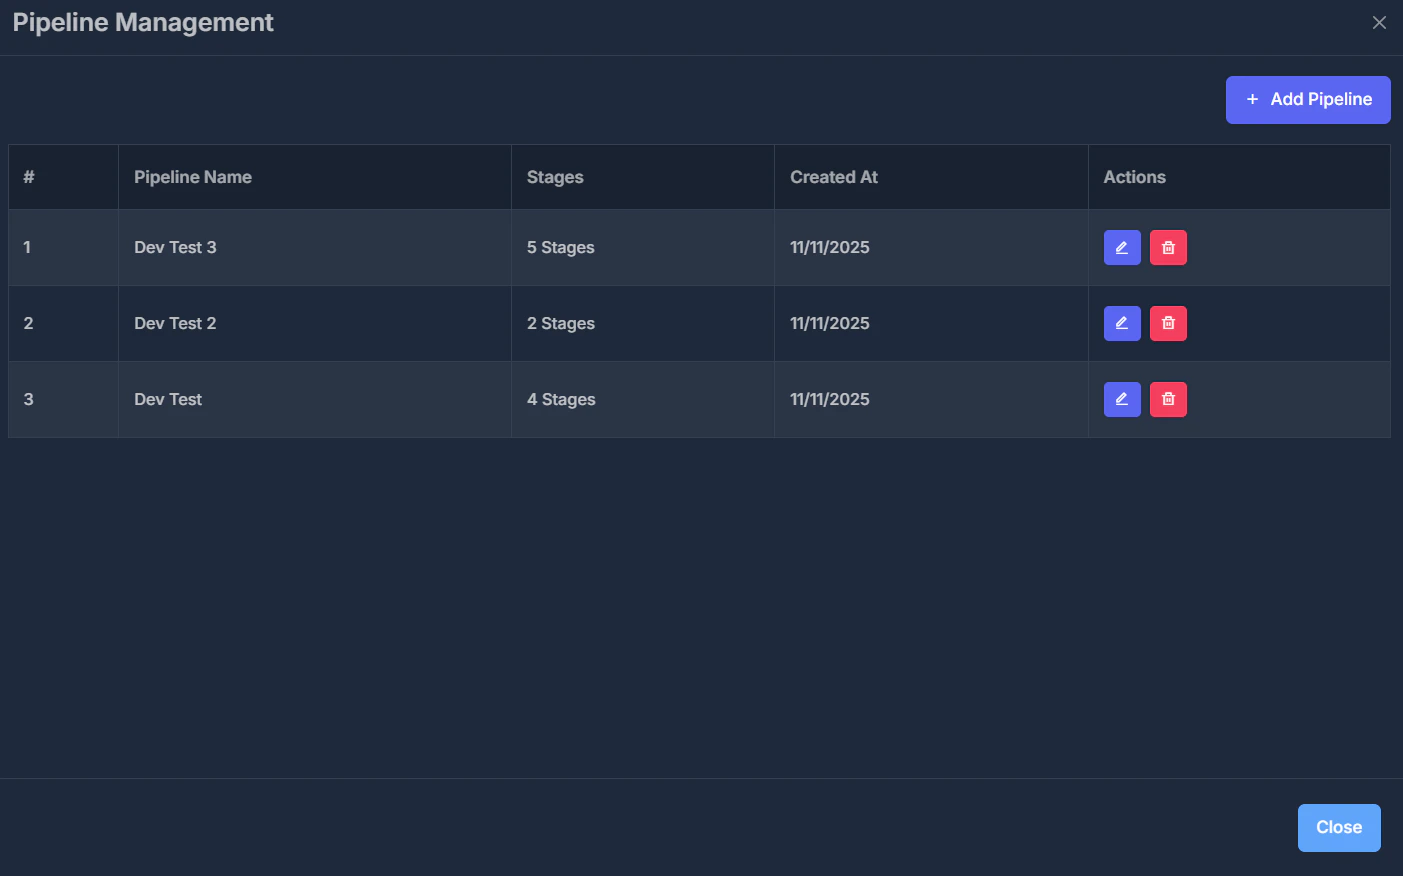
Follow these steps to add a new pipeline to your system:1️⃣ Open Pipeline Management
- Click Pipeline Management (top left).
- A list of all current pipelines will appear.
2️⃣ Start a New Pipeline
- In the Pipeline Management window, click + Add Pipeline (top right).
- This opens the pipeline creation form.
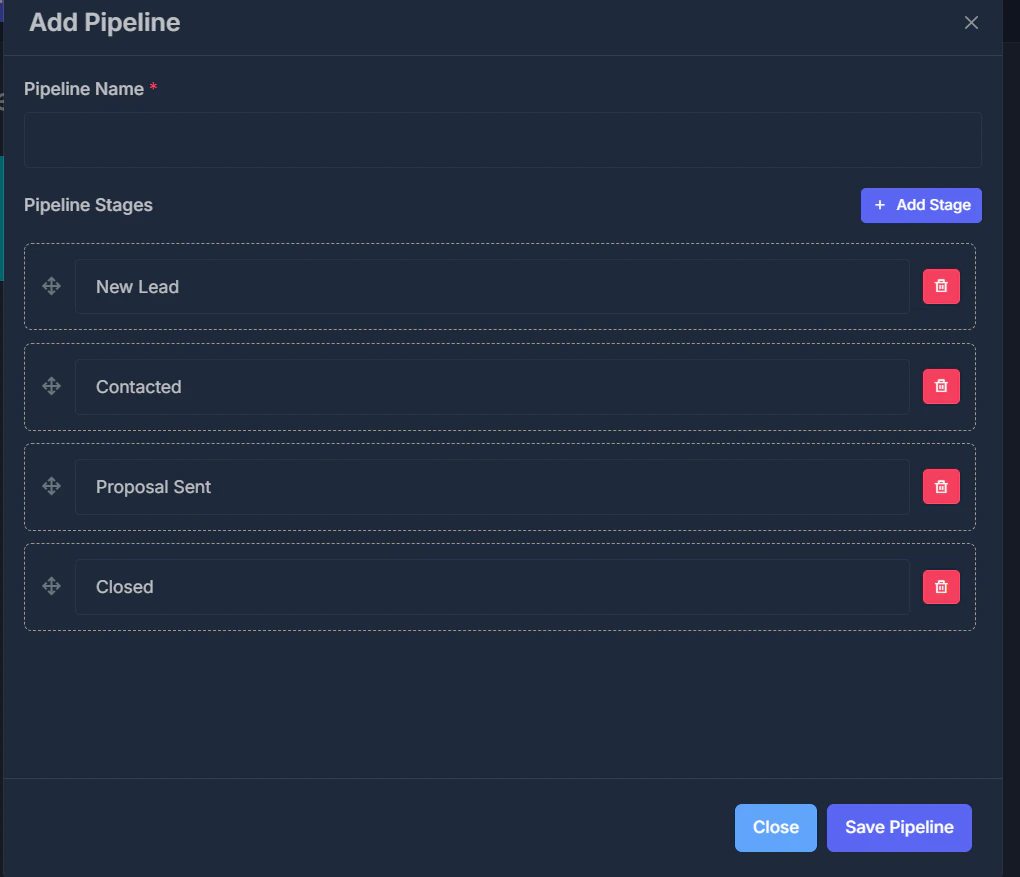
3️⃣ Specify Pipeline Name
- Fill in the Pipeline Name with a clear, descriptive title.
- Required field (indicated by *).
- Examples: “Sales Funnel”, “Product Development”, “Onboarding”.
4️⃣ Add, Remove, or Edit Stages
- The form starts with four default stages:
- New Lead
- Contacted
- Proposal Sent
- Closed
- You may keep, rename, remove, or add custom stages to fit your process.
5️⃣ Manage Stages
- Rename: Type directly in the stage name field.
- Delete: Click the red trash icon next to the stage.
- Add: Click Add Stage at the top of the stages section.
6️⃣ Reorder Stages
- Drag stages by the handle (horizontal lines left of the name).
- Drop them in your preferred order; this defines their display left-to-right.
7️⃣ Finalize and Save
- Double-check your stage names and order.
- Click Save Pipeline (bottom right).
- You’ll get a confirmation and your pipeline will display on the board.
🔧 Managing Pipeline Stages (For New and Existing Pipelines)
➕ Add a Stage
- Find the Pipeline Stages section while editing or creating a pipeline.
- Click Add Stage.
- A new editable row appears at the end of the list.
- Enter a name for the new stage.
- Note: Stages are not saved to your pipeline until you click Save Pipeline.
🗑️ Remove a Stage
- Click the trash icon next to the unwanted stage.
- The row is deleted instantly.
- At least one stage is always required; you’ll get a warning if you attempt to remove the last stage.
- Remember to hit Save Pipeline to apply deletions.
✏️ Rename a Stage
- Edit the text directly in the stage’s name.
- Click Save Pipeline to make your changes permanent.
🔄 Reorder Stages
- Hold and drag the handle left of a stage name.
- Move it up or down in the list.
- Visual cues indicate possible drop targets.
- Release to set the new position.
- For existing pipelines, changes save instantly; for new pipelines, click Save Pipeline.
📝 Editing a Pipeline
** Open the Edit Pipeline Window**- Click Pipeline Management.
- Find the pipeline to edit; click the blue Edit (pencil icon) button.
- The pipeline details open in an editable form.
- Pipeline Name: Change as needed in the name field.
- Stages: Add, remove, rename, or reorder using the controls above.
- Click Save Pipeline.
- Changes display immediately on your board.
🗑️ Deleting an Entire Pipeline
Removal Process- Open Pipeline Management.
- Find the pipeline to remove.
- Click the red Delete (trash icon) button.
- Confirm deletion when prompted.
- Deleted pipelines and their stages are permanently removed—this action cannot be reversed.
- After deletion, a refreshed board will reflect the change.
- Use the pipeline selector dropdown at the top of the Pipeline page.
- Select any of your pipelines to change the board view.
- The board updates instantly to show the corresponding stages.
- The newest pipeline is pre-selected when you enter the page.
- All pipelines are listed by name.
- Selected pipeline’s stages appear as interactive columns.
👤 Contact Details
When you click a contact (card) on the pipeline board, a Contact Details panel or window opens. Here you can view and manage the contact’s information, notes, appointments, and activity log.📋 Contact Details Tab
The Contact Details view shows the contact’s core information—name, phone, email, company, and any custom fields—so you can quickly see who they are and how to reach them.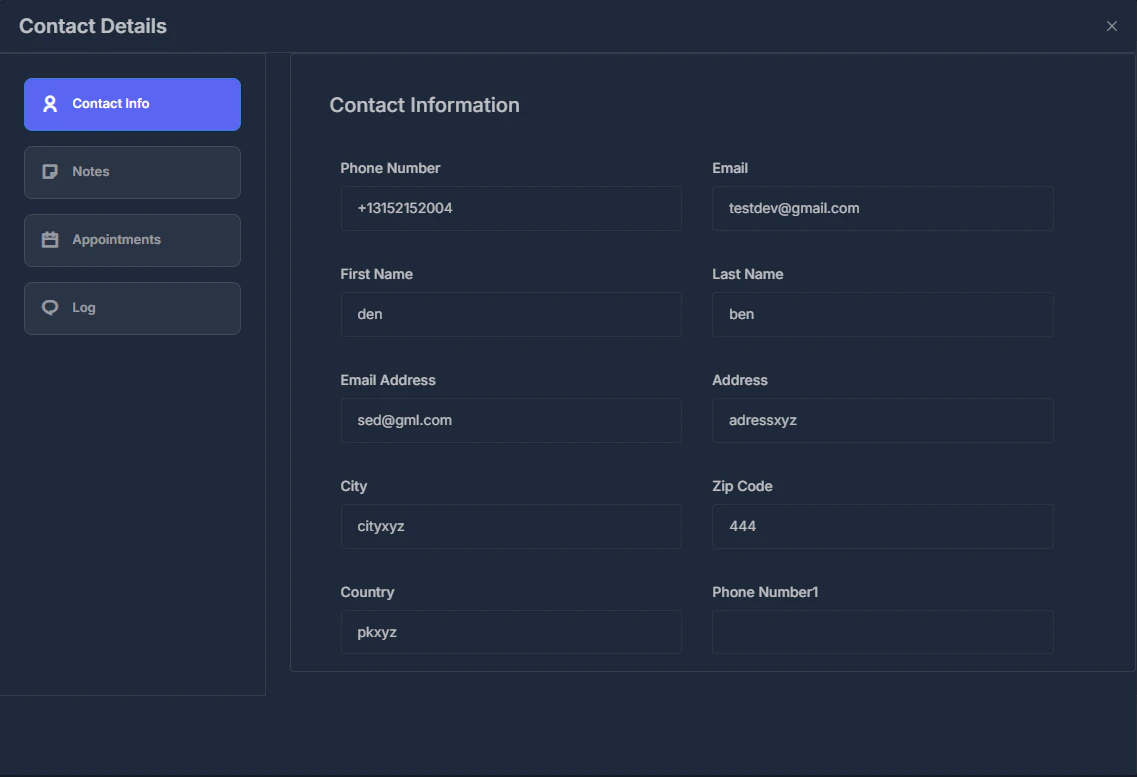
- Use this tab to view or edit the contact’s profile.
- Fields update when you save; changes are reflected across the pipeline.
📝 Notes Tab
The Notes tab lets you add and view notes for this contact. Keep context, follow-up reminders, and conversation summaries in one place.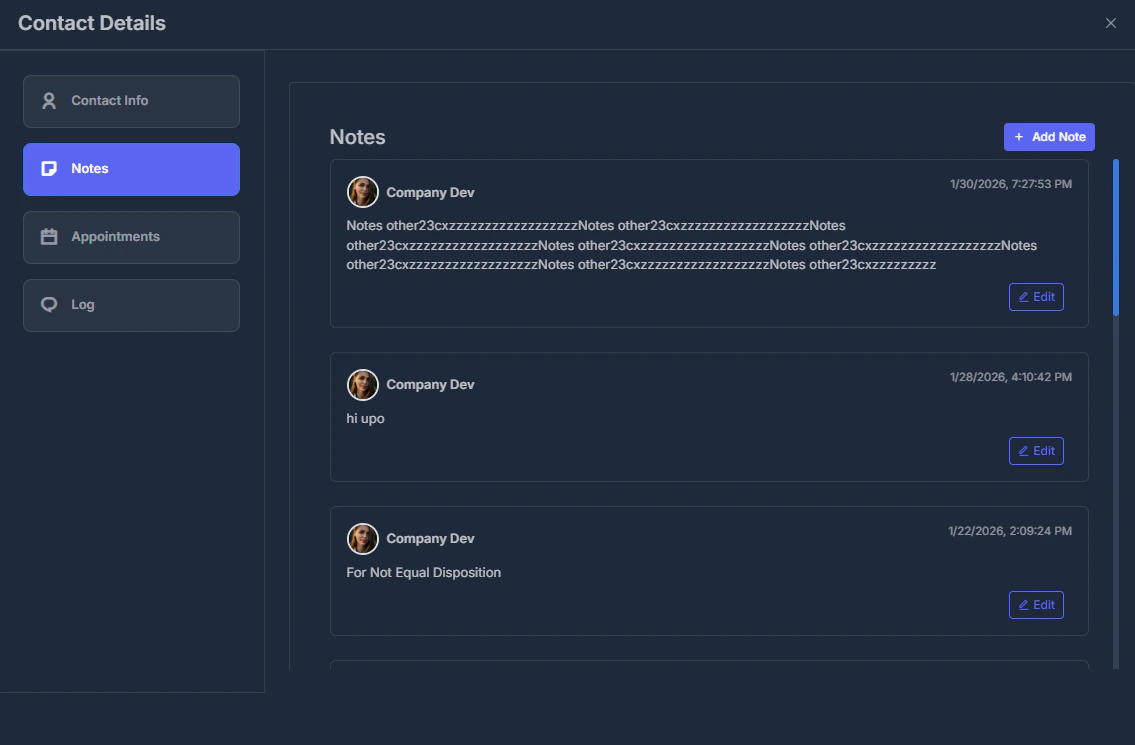
- Add a note – Enter text and save; the note is attached to the contact.
- View history – All notes appear in order so you can see the full context.
- Notes help the team stay aligned when moving contacts through pipeline stages.
📅 Appointment Tab
The Appointment tab shows appointments linked to this contact. You can see scheduled meetings, callbacks, or follow-ups without leaving the pipeline.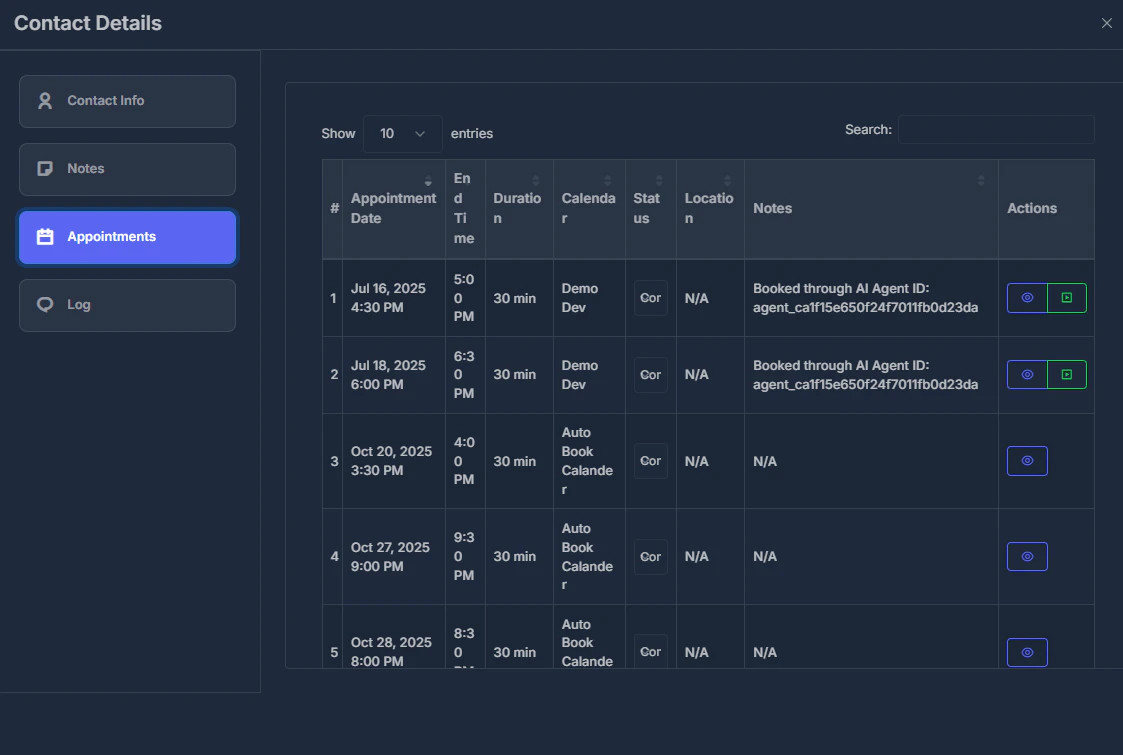
- View – See existing appointments (date, time, type, status).
- Add – Create new appointments for this contact from the same view.
- Use this to plan next steps and keep pipeline movement tied to real follow-up.
📜 Log Tab
The Log tab displays an activity log for the contact—calls, emails, SMS, stage changes, and other events in chronological order.
- What it shows – Past calls, messages, stage moves, and key actions.
- Chronological – Newest or oldest first, depending on your view.
- Use the log to understand the full history before moving the contact or adding notes.
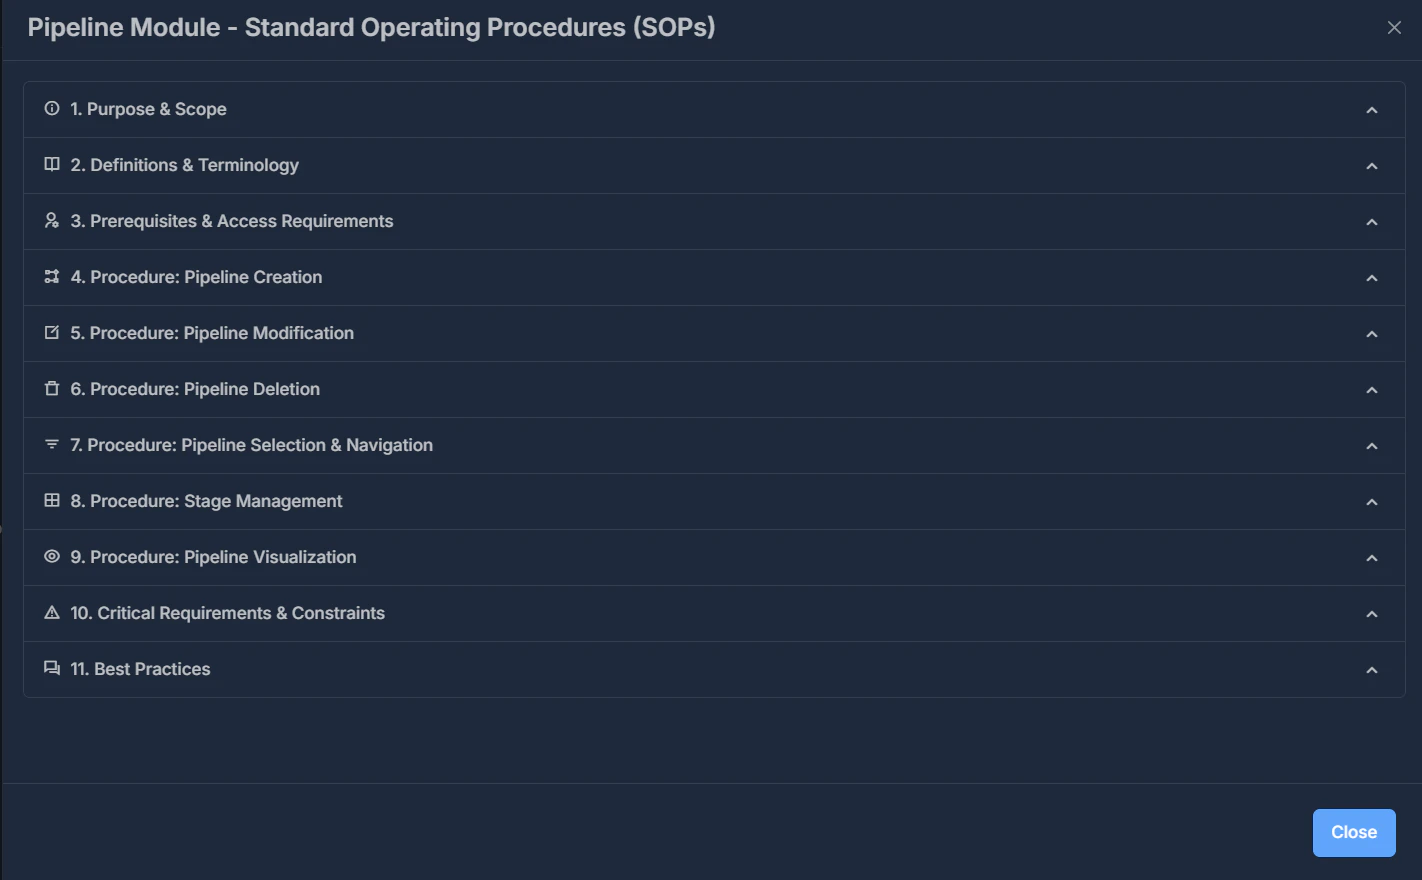
📚 SOPs: Standard Operating Procedures
-
Purpose & Scope
This Standard Operating Procedure (SOP) defines the systematic approach for creating, managing, and utilizing pipeline structures within the system to organize and track workflow processes through a visual Kanban board interface. This procedure applies to all authorized users who require access to the Pipeline Management Module for organizing business processes, sales workflows, or project management activities. -
Definitions & Terminology
- Pipeline: A structured workflow container that organizes processes into sequential stages
- Stage: A distinct phase within a pipeline representing a specific step in the workflow process
- Kanban Board: A visual representation displaying pipeline stages as columns with associated items
- Sorting Order: The sequential arrangement of stages determining workflow progression
-
Prerequisites & Access Requirements
- Valid user account with appropriate system permissions
- Access to the Pipeline Management Module
- Understanding of workflow processes to be implemented
- Procedure: Pipeline Creation 4.1 Initial Setup 4.2 Stage Configuration 4.3 Finalization
-
Procedure: Pipeline Modification
5.1 Accessing Edit Mode 5.2 Modification Operations 5.3 Saving Modifications -
Procedure: Pipeline Deletion
- Access the Pipeline Management interface.
- Identify the pipeline you wish to remove.
- Click the “Delete” icon associated with the desired pipeline.
- Review the system-generated confirmation dialog carefully.
- Confirm deletion by selecting “OK”, or cancel the operation if you do not intend to delete.
Important: Pipeline deletion is irreversible. Ensure no active workflows depend on the pipeline before proceeding.
-
Procedure: Pipeline Selection & Navigation
- Locate the pipeline selection dropdown menu in the header section.
- Click the dropdown and select the desired pipeline from the available options.
- Upon selection, the system will automatically display the Kanban board for the chosen pipeline, rendering all associated stages.
- Each stage will appear as an independent column within the Kanban interface.
- To switch views, simply repeat the selection process to navigate between different pipelines.
- Procedure: Stage Management 8.1 Adding Stages 8.2 Removing Stages 8.3 Reordering Stages
- Kanban Board Interface & Navigation 9.1 Kanban Board Interface 9.2 Navigation & Interaction
- Critical Requirements & Constraints
- Minimum Stage Requirement: Every pipeline must always contain at least one active stage; deletion of the last remaining stage is not permitted.
- Stage Sequence: The order in which stages are arranged determines the workflow’s progression. Ensure stages are sorted logically to accurately reflect your process.
- Pipeline Independence: The system supports multiple pipelines, each operating independently—changes to one pipeline will not impact others.
- Data Integrity: Deleting a pipeline will permanently erase all its configuration and stage data. This action is irreversible.
- Access Control: Only users with the appropriate permissions, as set by system administrators, can modify pipeline structures or settings.
- Best Practices
- Use Clear, Standardized Naming
- Regularly Review Configurations
- Maintain Consistent Stage Names
- Document Pipeline Purpose & Stages
- Test Before Production
When to Use SOPs
- When you need step-by-step instructions for any Pipeline Module operation.
- For quick lookups of terms, requirements, or best practices.
- If you’re troubleshooting a procedure or want to confirm the correct workflow.
- Whenever you want a detailed reference on-demand—keep the window open for ongoing help.
Refer to the SOPs window as your central knowledgebase for using, managing, and optimizing pipelines in the module.